|
|
| Overview |
The Data Importer executes "Import Tasks".
You can define multiple Import Tasks for a single Importer run.
Import Tasks are run consecutively based on the order defined in the Tasks List Pane.

Some Importer Task Types (such as: Document loading, BOM creation, Vendor Item assignment) may depend on existing Omnify objects.
Therefore, it is important to define the task order based on task types.
For example, if you are importing item documents, you may need to create an item creation/update task for the data source before creating the item document task to ensure specified items exist in the database.
Each task will have a task type:

| Item Data |
Creates new items and updates data on existing items.
Note: this task type also allows you to assign vendor items.
To assign vendors items, they must exist in the system first.
Thus, you may want to create a Vendor Items task before executing an Item Data task.
|
| Vendor Items |
Creates new vendor items and updates data on existing vendor items.
|
| Service Objects |
Creates new service objects and updates data on existing service objects.
|
| BOM Data |
Creates new BOMs and replaces data on existing BOMs.
|
| Item Documents |
Uploads new documents and assigns them to existing items.
|
| Vendor Item Documents |
Uploads new documents and assigns them to existing vendor items.
|
| Change/ECO Documents |
Uploads new documents and assigns them to existing Changes/ECOs.
|
|
 |
Task Creation |
Top |
|
To create a new Import task, click the Add Import Task link in the Tasks List pane.

The Task Properties area will update to show the Task Source Properties page.

For each task, there will be 2 pages available:
|
 |
Task Source/Type |
Top |
|
The Task Source page allows you to specify a Task name, object/data type, and data source.

The Omnify Data Importer will automatically assign a Task name.
You can define your own task name to help identify the task.

Task types can be one of the following:

| Item Data |
Creates new items and updates data on existing items.
Note: this task type also allows you to assign vendor items.
To assign vendors items, they must exist in the system first.
Thus, you may want to create a Vendor Items task before executing an Item Data task.
|
| Vendor Items |
Creates new vendor items and updates data on existing vendor items.
|
| Service Objects |
Creates new service objects and updates data on existing service objects.
|
| BOM Data |
Creates new BOMs and replaces data on existing BOMs.
|
| Item Documents |
Uploads new documents and assigns them to existing items.
|
| Vendor Item Documents |
Uploads new documents and assigns them to existing vendor items.
|
| Change/ECO Documents |
Uploads new documents and assigns them to existing Changes/ECOs.
|
From the Source Format drop list you will select from the following supported formats:

| • | SQL Server Database |
| • | Microsoft Access Database |
| • | Microsoft Excel File |
| • | OmniBOM File |
| • | Text File |
Selecting the format will update the data source area for specific settings/options based on that format.


For file based formats (Microsoft Access, Excel, OmniBOM, and Text) you will have the option to "Upload" a file to the server or use the file from its current location.

For the Importer to read data from the file, the file must be in a location that is accessible (read-able) by the Omnify web server applications.
Using the Upload File option will copy the file from the specified location to a local area available on the web server.
Using this process, you will avoid any potential file access problems.

However, some files (such as Microsoft Access and Excel) may be very large and using the Upload File option could cause file limitation and upload delay issues.
You can avoid this by using the Read from Location option.

Using this option will not create a copy on the web server and will avoid the upload process.
However, using this option will require that the web server has read access to the specified file location.
When the Upload File option is selected, you will be able to browse for the source file.

When the Read from Location option is selected, you must type the location and file name.

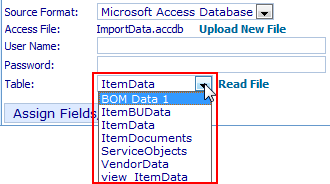
Once the file is specified, click the Load File link to upload the file.

For formats that require sheet or table selection (SQL Server, Access, Excel, and OmniBOM), you will then be required to select the desired sheet or table.
Once all source properties have been assigned, click the Assign Fields/Options button.
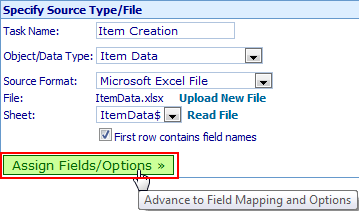
This will display the Task Field Mapping and Options page.
|
 |
Task Field Mapping and Options |
Top |
|
The Task Field Mapping and Options page contains the following areas:
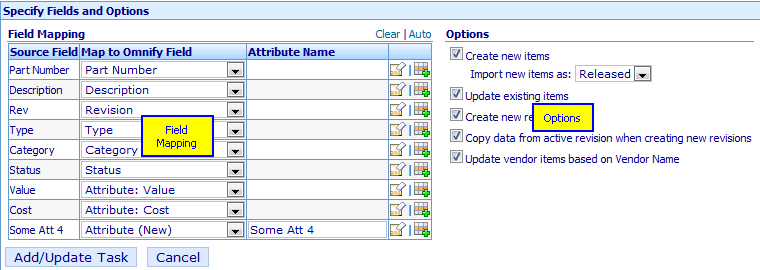
| Field Mapping |
Allows you to map fields form the input source to Omnify fields |
| Options |
Additional import options based on Object/Data type |
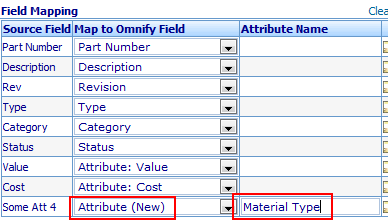
The Field Mapping list allows you to map fields found in the input source to Omnify fields.

The Source Field column will list all fields found in the input source.

The Omnify Field column provides a drop list that will list all available Omnify fields (based on the selected Object/Data Type) for each source field.
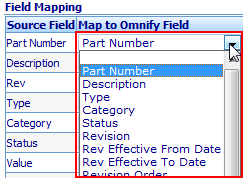
To map a source field to an Omnify field, select the desired field from the Omnify field drop list.

To ignore source fields, you can set the Omnify field to the blank entry in the list or click the Clear button in the Actions column.

You can have the system attempt to determine the appropriate mapping by clicking the AutoMap Field button in the Actions column.

For fields that you would like to map to a new attribute field, select the Attribute (New) drop list option.

You will then be able to define the new attribute name in the Attribute name field.
The settings in the Options list will depend on the selected Object/Data Type.
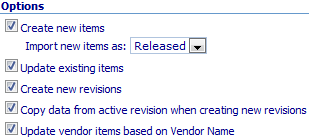
Item Data import tasks will contain the following options:
| Create new items |
If this option is checked, the Importer will create new items for part numbers not found in the source. If this option is not checked, the Importer will only update existing items. |
| Import new items as |
When creating new items, you can choose the new items internal states to be either released or draft. |
| Update existing items |
If this option is checked, the Importer will update data on existing items. If this option is not checked, the Importer will only create new items. |
| Create new revisions |
If this option is checked, the Importer will create new revisions of existing items. If this option is not checked, the Importer will only update existing revisions. |
| Copy data from active revision when creating new revisions |
If this option is checked, the Importer will copy data from the currently active revision when creating new item revisions. |
| Update vendor items based on Vendor Name |
If this option is checked, the Importer will search for matches on vendor names and update just the part numbers. If this option is not checked, the Importer will add all assigned vendor items regardless of whether or not there is an existing associated item from the same vendor. |
BOM import tasks will contain the following options:
| Run Condense Item check |
If this option is checked, the Importer will combine child part numbers for the same BOM that may appear on separate rows. |
| Update quantity on Condense |
If this option is checked, the Importer will sum the quantities from condensed items (when the Run Condense Item check option is enabled). |
| Rest item numbers |
If this option is checked, the Importer will reset the item numbers on imported BOMs. |
Vendor Item import tasks will contain the following options:
| Create new items |
If this option is checked, the Importer will create new vendor items for vendor part numbers not found in the source. If this option is not checked, the Importer will only update existing vendor items. |
| Update existing items |
If this option is checked, the Importer will update data on existing vendor items. If this option is not checked, the Importer will only create new vendor items. |
| Update supplier items based on Supplier Name |
If this option is checked, the Importer will search for matches on supplier names and update just the part numbers. If this option is not checked, the Importer will add all assigned supplier items regardless of whether or not there is an existing associated item from the same supplier. |
Service Object import tasks will contain the following options:
| Create new items |
If this option is checked, the Importer will create new service objects for numbers not found in the source. If this option is not checked, the Importer will only update existing service objects. |
| Update existing items |
If this option is checked, the Importer will update data on existing service objects. If this option is not checked, the Importer will only create new service objects. |
Document import tasks will contain the following options:
| Update document when matched on field |
This option allows you to set a field (such as Document type, title, vault, etc.) to match existing documents on.
If a match is found, the Importer will simply update the existing document with the document identified in the source.
If no match is found, the document will be added as a new document.
Setting this field to [Do not match - Always add document] will instruct the Importer to always add the source documents.
|
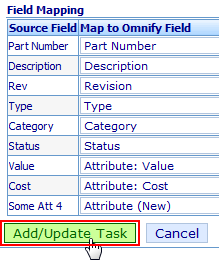
Once all mappings and options have been defined, click the Add/Update Task button.
|
 |
Editing Tasks |
Top |
|
Once a task has been defined (or loaded from XML), you can modify the settings by clicking the Edit hyperlink in the Actions column of the Task List.

Refer to the previous sections for more information on setting the fields and options for each task.
|
 |
Removing Tasks |
Top |
|
Once a task has been defined (or loaded from XML), you can remove it by clicking the Remove hyperlink in the Actions column of the Task List.

|
|
|
Import Tasks are run consecutively based on the order defined in the Tasks List Pane.

Some Importer Task Types (such as: Document loading, BOM creation, Vendor Item assignment) may depend on existing Omnify objects.
Therefore, it is important to define the task order based on task types.
For example, if you are importing item documents, you may need to create an item creation/update task for the data source before creating the item document task to ensure specified items exist in the database.
Additional tasks will be appended to the Task List.
You can modify the order using the Up and Down hyperlinks in the Actions column.

|
 |
Saving Tasks |
Top |
|
Task Lists can be saved to an XML file to be loaded for subsequent Importer sessions.
To save the Task List, click the Save Task(s) link in the Task List pane.
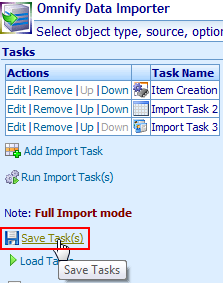
An Omnify XML (.oxf) file will be generated.
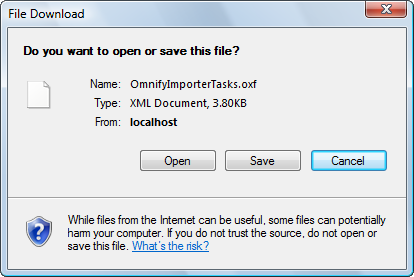
Using this file, you can modify tasks using any XML and/or text file editor.
Refer to the next section for information on loading the XML file.
|
 |
Loading Tasks |
Top |
|
Importer tasks can be created interactively or loaded from Omnify XML files.
The Omnify XML file format can be generated using the Save Task(s) feature (described above).
Once an XML file has been created, you can load the file by clicking the Load Tasks hyperlink.
This will display the Load from file dialog box.
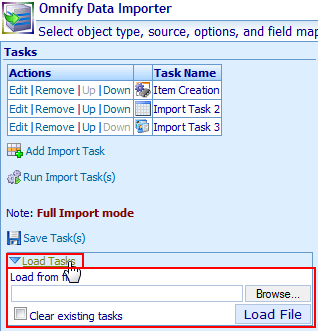
From the Load from file dialog box you can browse for the desired XML file.

Once the file has been selected, click the Load File button to read the XML file and load the tasks.

Checking the Clear existing tasks option will clear the current task list and add the tasks from the XML file.
If this option is not checked, the system will append the new tasks from the XML file to the existing task list.
|
|