|
|
| Overview |
Omnify Desktop and OmniBOM support importing BOM files in the following file formats:
You can import files directly from Engineering (CAD/CAE) tools such as Cadence OrCAD, Mentor DxDesigner,
SolidWorks, PTC ProEngineering/ProInterlink, etc. and from ERP/MRP systems such as SAP, Oracle, Intuitive, Made2Manage, Great Plains, etc.
|
 |
Importing BOM Files |
Top |
|
To import a BOM file, use the Import command from the File menu or toolbar.
You will be asked to specify the BOM file and format.

|
 |
Importing OmniBOM Files |
Top |
|
|
When importing OmniBOM (.obx) files, the
Import Wizard will present the following pages/options:
|
 |
Importing Text Files |
Top |
|
The Import Wizard accepts delimited, fixed width, and columnar text/ASCII files.
When importing text files, it is important to first know and understand the file's format before setting up the import options.
Refer to the Text Format Selection Page for more information on these file formats and import options.
When importing text files, the Import Wizard will present the following pages/options:
|
 |
Importing CSV Files (Comma-Separated Values) |
Top |
|
CSV Files are text/ASCII files where the field data is separated with a comma.
Optionally double-quotation marks can be used as text qualifiers to help delimit the field data.
Below is an example of a CSV (Comma-Separated Values) file:
| Item,"Part Number",Qty,Refdes,Description |
| 1,07-0010-00,1,U12,"0805, 10UF, 35V" |
| 2,25-0005-00,1,"U1,U2",PowerQuicc 860T |
Notice that for fields that contain commas in the field values, the text qualifier is used.
When importing CSV files, the Import Wizard will present the following pages/options:
|
 |
Importing Excel Spreadsheets |
Top |
|
When importing a Microsoft Excel file, you will be asked to select which sheet you wish to import on the Initial/Welcome Page.

You will also be able to identify if the sheet contains a column header row as the first row in the spreadsheet.

For example, if the source looked like:

You would check the First row contains field names option.
When importing Excel spreadsheets, the Import Wizard will present the following pages/options:
|
 |
Importing Access Databases |
Top |
|
When importing a Microsoft Access database, you will be asked to select which table you wish to import on the Initial/Welcome Page.

If the file is password protected, you will be able to specify the password.

When importing Access tables, the Import Wizard will present the following pages/options:
|
 |
BOM Import Wizard |
Top |
|
The BOM File Import Wizard contains the following pages:
The Import Wizard will configure and display these pages based on the input file format and options specified during the import process.
|
 |
Initial/Welcome Page |
Top |
|
The first page of the BOM File Import Wizard allows you to verify the import file, file format, and initial options.
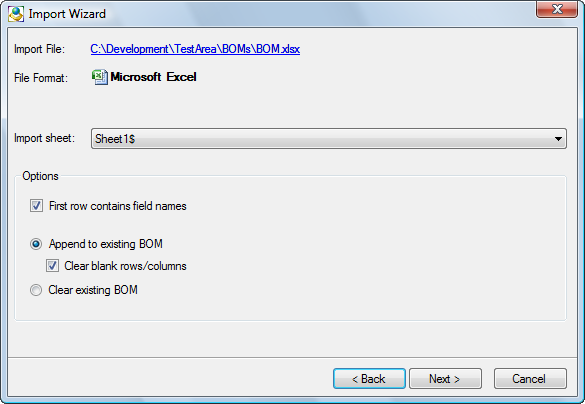
You can open the file to be imported by selecting the Import File hyperlink.

The Format section will display the format that the Import Wizard has assumed for the file (based on file extensions).
When importing a Microsoft Excel file, you will be asked to select which sheet you wish to import.

You will also be able to identify if the sheet contains a column header row as the first row in the spreadsheet.

For example, if the source looked like:

You would check the First row contains field names option.
When importing a Microsoft Access database, you will be asked to select which table you wish to import.

If the file is password protected, you will be able to specify the password.

In the Options section, you can specify how the system should handle any existing data in the current BOM.
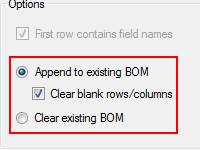
Options include:
| Append to existing BOM |
Preserves current BOM data and merges it with the new/imported data |
| Clear blank rows/columns |
When appending to the existing BOM, the system can clear blank rows and columns when importing |
| Clear existing BOM |
Clears all data from the current BOM and replaces |
Once all options are set, click the Next button to advance to the next page.

|
 |
Text Format Selection Page |
Top |
|
The Import Wizard accepts delimited and columnar text/ASCII files.
When importing text files, it is important to first know and understand the file's format before setting up the import options.
Delimited files contain a single character either after or before the field data.
Below is an example of a delimited file which uses a semicolon ( ; ) as the delimiting character:
| #;QTY;REFDES;CORP_PARTNUM;PACKAGE;VALUE |
| 1;1;C1;307025472;0805;4700UF |
| 2;1;C2;306100220;;22UF |
| 3;1;C3;310804750;CK05;4.7UF |
| 4;1;R1;R-14-126;RES400-100;10K |
| 5;1;R2;R-14-102;RES400-100;10 |
| 6;1;R3;R-14-152;RES400-100;1MEG |
Columnar format files are text files where the column header and value appear on the same line and delimited by a character.
Individual BOM lines are delimited by a blank line (or other character line).
Below is an example of a columnar file:
| #=1 |
| QTY=1 |
| REFDES=C1 |
| CORP_PARTNUM=307025472 |
| PACKAGE=0805 |
| VALUE=4700UF |
| |
| #=2 |
| QTY=1 |
| REFDES=C2 |
| CORP_PARTNUM=306100220 |
| VALUE=22UF |
| |
| #=3 |
| QTY=1 |
| REFDES=C3 |
| CORP_PARTNUM=310804750 |
| PACKAGE=CK05 |
| VALUE=4.7UF |
The Text Format Page provides you with a preview window, which displays the contents of the file.
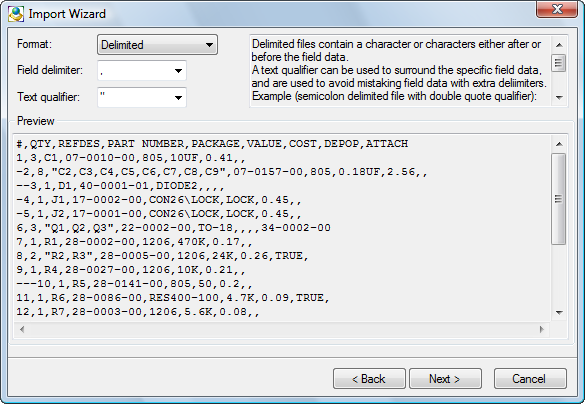
On this page, you must select from the 2 different supported text file formats (Delimited or Columnar) in the Format drop list.

Once the format is selected, you can them specify the field delimiting character.

A Text Qualifier represents a character that encloses values in your text file.
When Omnify encounters the text qualifier character, all of the text that follows that character and precedes the next occurrence of that character is imported as one value, even if the text contains a delimiter character.
For example, if the delimiter is a comma (,) and the text qualifier is a quotation mark ("), "Dallas, Texas" would be imported into one cell as Dallas, Texas.
If no qualifier or if the apostrophe (') qualifier were specified, "Dallas, Texas" would be imported into two adjacent cells as "Dallas and Texas".
You can set the Text Qualifier character in the Text Qualifier drop list

Once all text file options are set, click the Next button to advance to the next page.

|
 |
Column Header and Data Line Page |
Top |
|
The Column Header and Data Line page allows you to specify:
- Row/line that the column names/header appears
- Row/line that the data starts
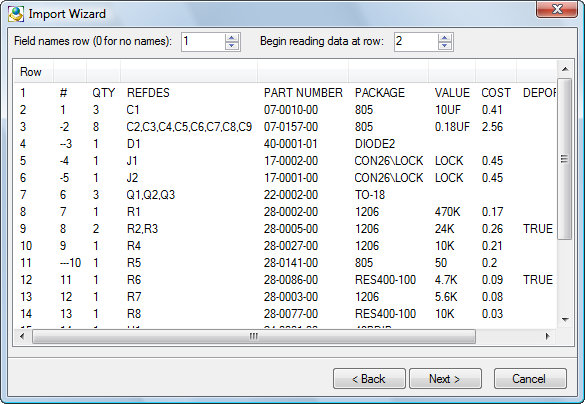
The preview window will display all line/row numbers.
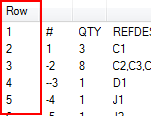
To set the Field names line, specify the row number in the Field names row text box.

If no field names are present in the file, set this value to 0

To set the row where data begins, specify the row number in the Begin reading data at row text box.

Once the header and data start row are defined, click the Next button to advance to the next page.

|
 |
Column Selection Page |
Top |
|
The Column Selection Page allows you to configure the following settings:
- Columns to Import - Include/ignore/rename columns from import
- Special Fields - "Wrapped" data and Hierarchy fields
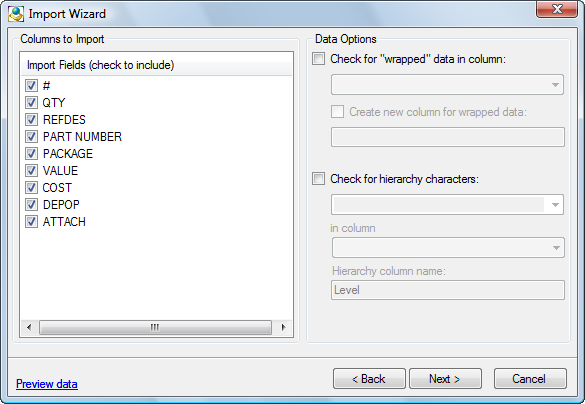
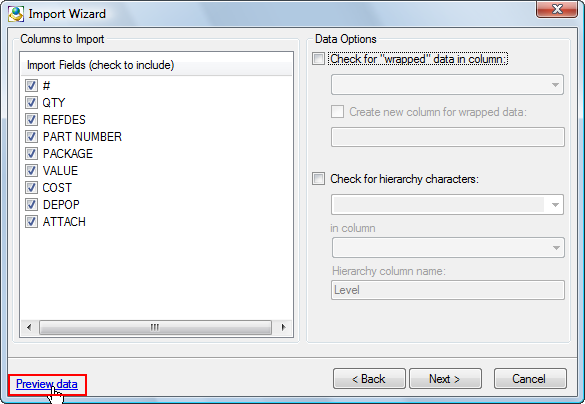
You can specify which fields to import (or ignore) on the Column Selection Page of the Import Wizard.
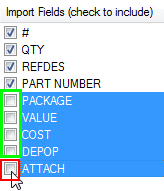
To include or ignore fields, check or uncheck the fields in the Columns to import list.
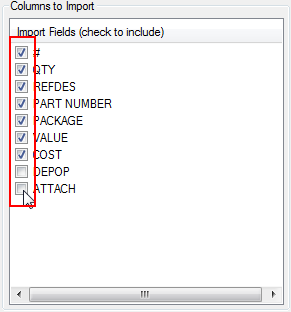
Note: you can check/uncheck multiple fields by first selecting the fields and then clicking a checkbox.
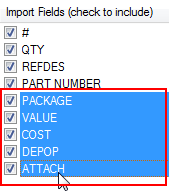
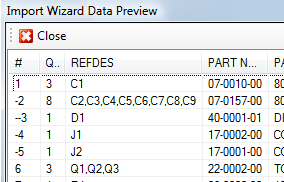
You can preview the data to determine column settings by clicking the Preview data hyperlink.
If the Check for "wrapped" data in column: option is checked, the Import Wizard will attempt to determine if data on subsequent lines is a continuation of data from the previous row.
For example, an import file contains the following format:
| Item |
Part Number |
Qty |
| 1 |
07-0010-00 |
1 |
|
0805,10UF,35V |
|
| 2 |
25-0005-00 |
1 |
|
PowerQuicc 860T |
|
Notice that in the above file, the part description appears on the subsequent lines.
Setting the following options:
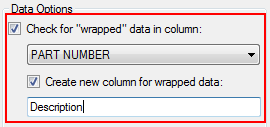
Would result in the following:

If the Check for hierarchy characters option is checked, the Import Wizard will automatically create a separate column, and define which level/position each item occurs in the BOM.
For example, if you were importing a file with the following format:
| Qty |
Part Number |
Refdes |
| 5 |
01-100-034 |
U1-U5 |
| -2 |
01-320-001 |
C1,C2 |
| --1 |
01-900-078 |
R5 |
| -1 |
01-900-064 |
R20 |
Where the dashes (-) represent the level that item appears in the hierarchy.
If you set the options accordingly,
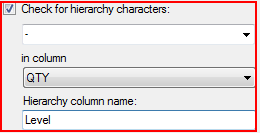
the result would be:
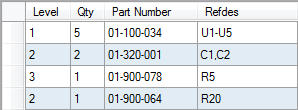
Once all column options are set, click the Next button to advance to the next page.

|
 |
Data Preview Page |
Top |
|
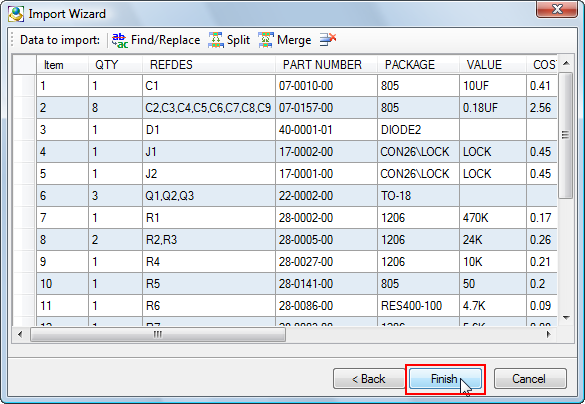
The final page of the Import Wizard provides a preview of the data to be imported.
It also provides you with editing functions to modify data before importing it.
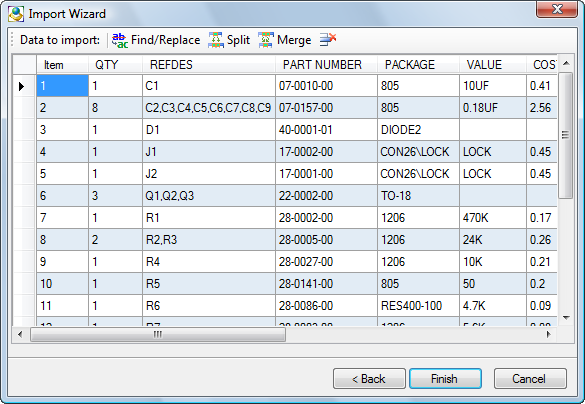
To rename a field in the Data Preview form, double-click on the field heading cell

Double-clicking on any field header cell will invoke the Column Name dialog box:

To rename the column, specify a new column name and then click the OK button.


Within the Data Preview form you can manually edit any of the BOM cells.
To edit an individual cell, click the left mouse button within the cell to select.

You can then type into the cell directly.

Notice the edit icon will appear in the row header.

You can also use the standard windows hot keys to copy, cut, paste and delete (Ctrl+C, Ctrl+X, Ctrl+V, Delete) text within the cells.
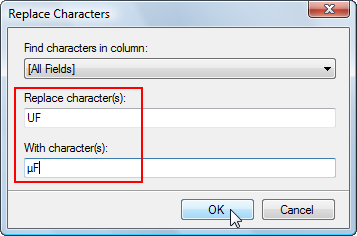
The Find/Replace feature allows you to replace text in all cells of the Data Preview form.
To launch the Find/Replace dialog box, click the Find/Replace button from the form toolbar.

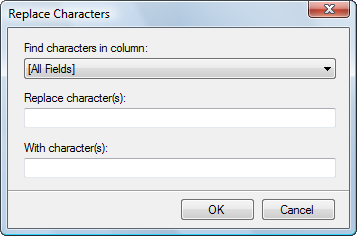
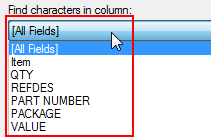
From the Replace Characters dialog box, you can select which field (or all fields) you wish to replace text in.
You can then specify the characters/text you wish to find and the characters/text you wish to replace it with.
The Import Wizard allows you to split/expand an individual column into multiple columns.
To split a column, select the Split button from the form toolbar.

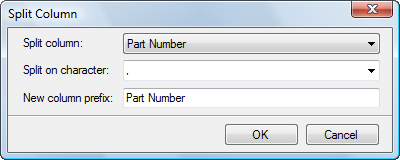
From the Split Column dialog box, you will need to specify the column you wish to
split and the separation characters to search for as field delimiting characters.

You can then specify a new column prefix.

OmniBOM will automatically determine the number of columns to create based on the field delimiters in each item.
Each new column to be created will contain the specified prefix followed by the new column count (e.g. Desc1, Desc2, etc.).
Example: Split the Description field into individual fields based on a comma separator.
Before the split:

After the split:

The Import Wizard allows you to combine/concatenate data in multiple columns into a single column.
To combine columns select the Merge button from the form toolbar.

The Merge Column dialog box will list all of the current columns.

To add columns you wish to merge, select the column from the Merge Columns drop list and then click the Add button.

You can add as many columns as necessary.

You can change the data order by selecting the column(s) and using the Move Up and Move Down buttons.

You will then specify the new column name and separation character.

Optionally, you can have the system remove the merged columns by checking the Remove merged columns option.

Once the fields and separation character have been specified, click the OK button to merge the specified columns.
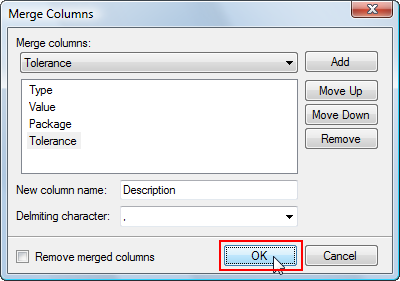
Example: Combine the Type, Value, Package, and Tolerance fields into a Description field.
Before the merge:

After the merge:

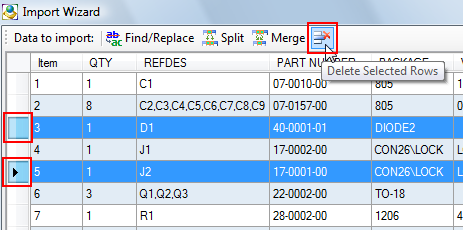
You can remove rows from the Data Preview form by first selecting the rows, and then clicking the Delete Selected Rows toolbar button.
When you have completed all edits and are satisfied with the data, click the Finish button to import the data.
|
|