|
|
| Overview |
OmniBOM provides you with the ability to search/use the Omnify database directly.
Using the Omnify Database connections you can:
| Find/Update All |
Allows you to define fields to search for matching values (such as Part Number, Vendor Name, Vendor Part Number, etc) as well as fields you wish to load into the BOM window from the matching Omnify Items for all BOM rows. |
| Find/Update Row/Item |
Allows you to define fields to search for matching values (such as Part Number, Vendor Name, Vendor Part Number, etc) as well as fields you wish to load into the BOM window from the matching Omnify Items for specified BOM rows. |
| Add BOM Items |
Allows you to search the Omnify database to find items to add to the BOM form |
| Open Omnify Item |
Allows you to launch the Omnify item from a specific row in the BOM form |
| Open an Omnify BOM |
Allows you to open a BOM stored in the Omnify database |
| Upload to Omnify |
Allows you to upload the BOM to Omnify |
| Omnify BOM Data Sets |
Allows you to open and modify BOM "Data Sets" stored in the Omnify database |
When launching OmniBOM, a login dialog box will appear.

Once you have logged in, the system will then enable all database functions.
|
 |
Find/Update All BOM Items from Omnify |
Top |
|
OmniBOM can match all rows of a BOM to the Omnify database to determine if a corresponding database item was found.
You can define fields to search for matching values (such as Part Number, Vendor Name, Vendor Part Number, etc) as well as fields you wish to load into the BOM window from the matching Omnify Items.
To perform the Find/Update, select the Update All from Omnify command from the Data menu.

This will invoke the Update From Omnify Wizard.

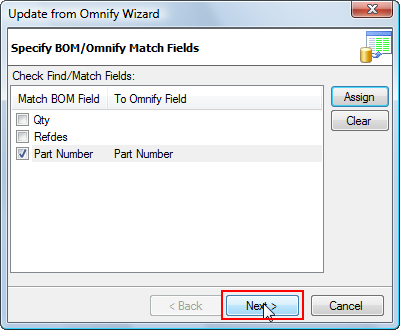
On the first page of the wizard, you will select/check the fields you wish to match in the Omnify database.

Once the field is selected, OmniBOM will attempt to automatically find a matching field from the Omnify database.

To set or change the mapped Omnify field, first select the field and then click the Assign button.

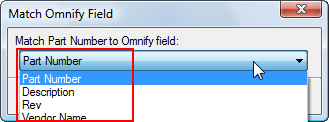
This will invoke the Match Omnify Field dialog box.
You will be able to select from a list of Omnify fields to map.
Once all search fields have been specified, click the Next > button to advance to the next page.
The next page allows you to select which fields to add/update the BOM form from the matching item Omnify data fields.
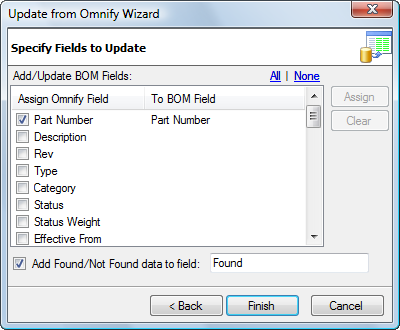
To select fields to add/update, check the checkbox of the desired field.
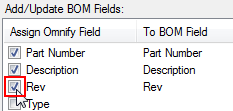
OmniBOM will automatically set the BOM field name to the database field name.
You can change this by selecting the field and clicking the Assign button.

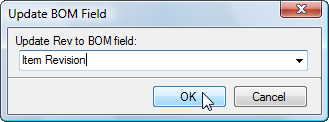
From the Update BOM Field dialog box, you will be able to select or type the BOM field name you wish to populate.
If the Add Found/Not Found data to field option is checked, the system will add/update the specified field with data from the search results.
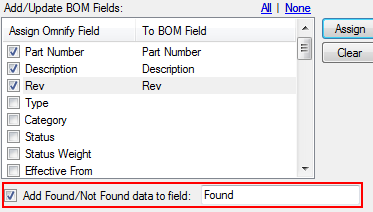
OmniBOM will search the database for matching items and report the results back to the BOM form.
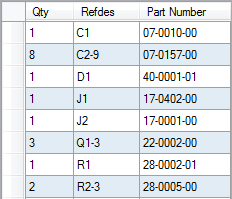
Before the command is executed:
After the command is executed:
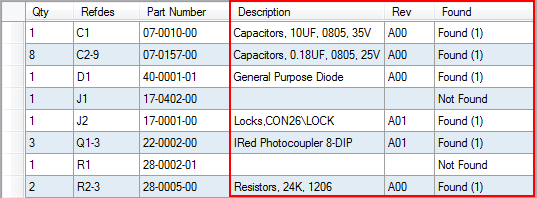
In the example above, OmniBOM automatically added data fields (Description and Rev), and created a Found field that display the results.
|
 |
Find/Update Row(s) from Omnify |
Top |
|
As mentioned in the previous section, OmniBOM can search the Omnify database to find matches on all BOM items.
As well as verifying the entire BOM, you can also search for matches on individual rows in the BOM.
To search for matches on a row, first select the cell/row and then click the right mouse button.
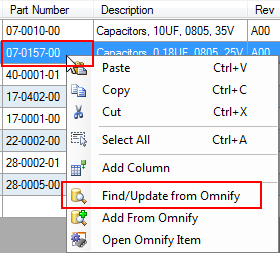
From the context menu, select the Find/Update from Omnify command.
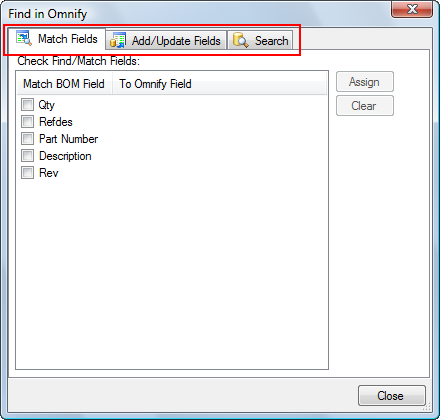
The Find in Omnify dialog box contains 3 tabs:
| Match Fields |
Allows you to select which fields you wish to search on |
| Add/Update Fields |
Allows you to select which BOM fields you wish to update on matches |
| Search |
Provides database searching functions |
OmniBOM will attempt to automatically find fields to Search based on the selected cell.
You can change/set the search fields by selecting the Match Fields tab.
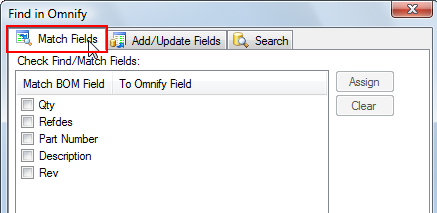
From this tab; you will select/check the fields you wish to match in the Omnify database.

Once the field is selected, OmniBOM will attempt to automatically find a matching field from the Omnify database.

To set or change the mapped Omnify field, first select the field and then click the Assign button.

This will invoke the Match Omnify Field dialog box.
You will be able to select from a list of Omnify fields to map.

Once the Match Fields have been set, click the Add/Update Fields tab to select the BOM fields you wish to update.
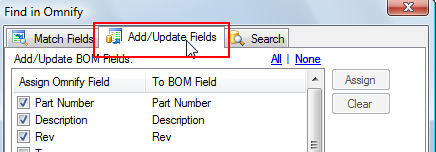
This tab allows you to select which fields to add/update the BOM form from the matching item Omnify data fields.
To select fields to add/update, check the checkbox of the desired field.

OmniBOM will automatically set the BOM field name to the database field name.
You can change this by selecting the field and clicking the Assign button.

From the Update BOM Field dialog box, you will be able to select or type the BOM field name you wish to populate.

Once the Match Fields and Add/Update Fields are defined, click the Search tab to start the database search.

The Search tab provides you with an Operation drop list.
The options will be: Update BOM Items or Add BOM Items (discussed in subsequent section).

When the Update BOM Items option is selected, the Update drop list will display the rows/items in the BOM.
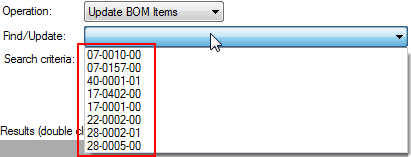
From this list, you will select the item/row you wish to update.
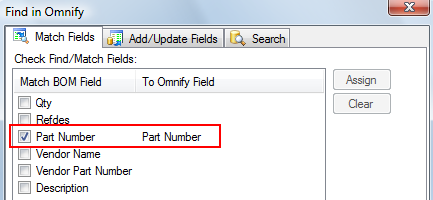
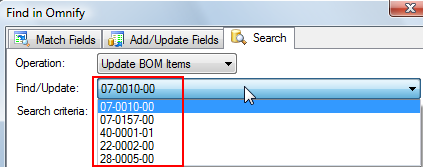
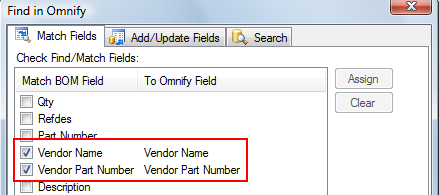
Note: the values in this list will depend on the fields you have checked on the Match Fields list.
For example: a BOM contains the following data:

| With Match Field set to: Part Number |
 |
 |
| |
| With Match Field set to: Vendor Name and Vendor Part Number |
 |
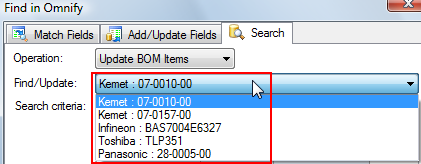 |
Once the BOM Item is selected, the Search criteria list will be updated with the data from the selected BOM item.

The Results list will display all matching database items.
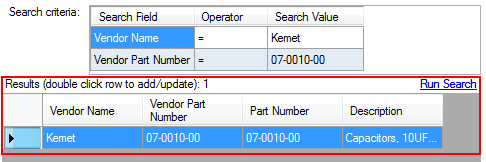
You can update the BOM item, by double-clicking on the database item in the Results list.

The BOM will update with data from the Omnify database.

You can modify the search parameters by clicking the Search Value cell and typing a new search value.
Note: wildcards (*) can be used.
Click the Run Search link to execute the search and update the Results list.
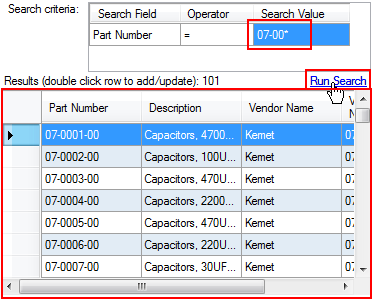
The fields in the Search criteria list are dependent on the fields checked on the Match Fields tab.
To add additional Search fields, check the desired fields on the Match Fields tab.
When specifying search parameters, you can use wildcards (*) to denote one or more characters.

You can also toggle the Operator field from = to like by clicking the cell.
|
 |
Add BOM Items from Omnify |
Top |
|
OmniBOM provides functionality to search the Omnify Database to add items to the BOM window.
To add items from the Omnify Database, click the Add from Omnify toolbar button in the BOM window.

This will invoke the Find in Omnify dialog box.

The Find in Omnify dialog box contains 3 tabs:
| Match Fields |
Allows you to select which fields you wish to search on |
| Add/Update Fields |
Allows you to select which BOM fields you wish to update on matches |
| Search |
Provides database searching functions |
OmniBOM will attempt to automatically find fields to Search based on the selected cell.
You can change/set the search fields by selecting the Match Fields tab.

From this tab; you will select/check the fields you wish to match in the Omnify database.

Once the field is selected, OmniBOM will attempt to automatically find a matching field from the Omnify database.

To set or change the mapped Omnify field, first select the field and then click the Assign button.

This will invoke the Match Omnify Field dialog box.
You will be able to select from a list of Omnify fields to map.

Once the Match Fields have been set, click the Add/Update Fields tab to select the BOM fields you wish to update.

This tab allows you to select which fields to add/update the BOM form from the matching item Omnify data fields.
To select fields to add/update, check the checkbox of the desired field.

OmniBOM will automatically set the BOM field name to the database field name.
You can change this by selecting the field and clicking the Assign button.

From the Update BOM Field dialog box, you will be able to select or type the BOM field name you wish to populate.

Once the Match Fields and Add/Update Fields are defined, click the Search tab to start the database search.

The Search tab provides you with an Operation drop list.
The options will be: Update BOM Items or Add BOM Items (discussed in subsequent section).

To add items, select the Add BOM Items option.
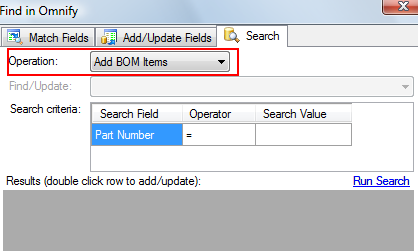
The Search criteria list will display the fields you have checked on the Match Fields tab.
To add additional Search fields, check the desired fields on the Match Fields tab.
You can modify the search parameters by clicking the Search Value cell and typing a new search value.
Note: wildcards (*) can be used.
When specifying search parameters, you can use wildcards (*) to denote one or more characters.

You can also toggle the Operator field from = to like by clicking the cell.
Once the search criteria have been defined, click the Run Search link to execute the search and update the Results list.

To add an item, double-click the item/row in the Results list.
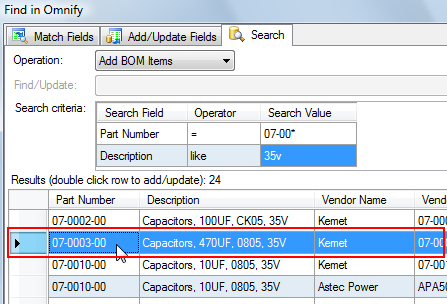
The new item will be added/appended to the BOM

|
 |
Open Omnify Item Form from BOM Item |
Top |
|
You can launch the Item form in Omnify Desktop directly from the BOM window.
To launch the Item form, first select the part number cell in the BOM item.
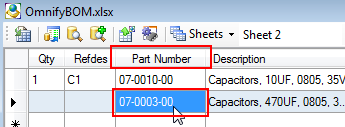
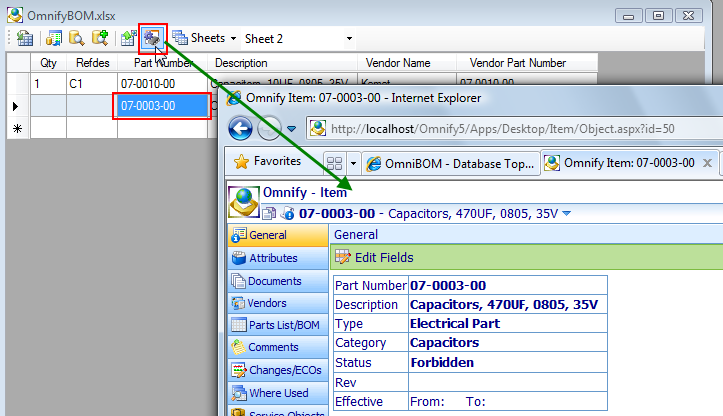
Then click the Open Omnify Item button from the BOM window toolbar.

The Item Master will appear in a browser window.
You may be asked to log in to Desktop first.
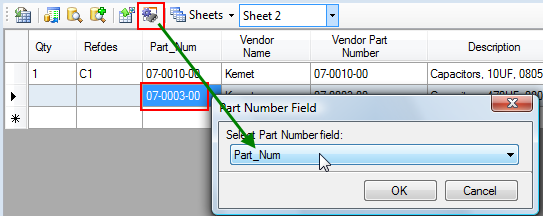
Note: to open the item form in Desktop, OmniBOM must be able to determine the Part Number.
By default, it will search the BOM for a field named "Part Number" or "PartNumber", to determine the part number of the item.
If OmniBOM cannot determine the Part Number field, you will be asked to select the field that represents the item part number field.
|
 |
Open an Omnify BOM |
Top |
|
To open a BOM stored in the Omnify database, select the Open Omnify BOM command from the File menu.
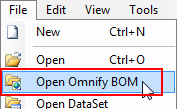
This will invoke the Select Omnify BOM Item search form.
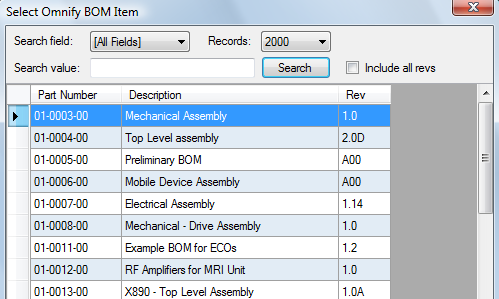
From the Select Omnify BOM Item search form, you can search the key fields for a specific item.

Once you find the desired BOM item, select it and click the OK button.
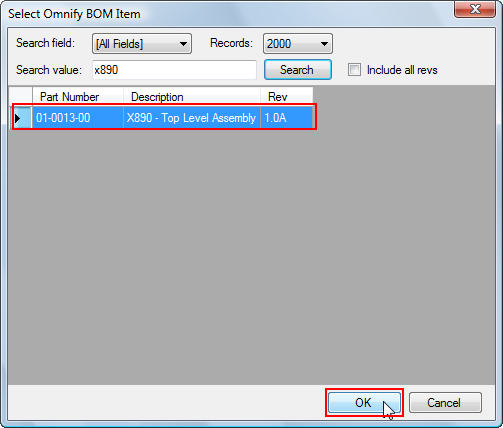
The BOM will open in the OmniBOM window.

|
 |
Upload BOM to Omnify |
Top |
|
The BOM Import Wizard of Omnify Desktop can read the native OmniBOM (.obx) files.
To upload a BOM to Desktop, you can simply save the BOM to an OmniBOM file and then import it once you are in Desktop.
OmniBOM also provides a direct upload method that eliminates the need to save the BOM as an external file.
The Omnify database provides a "BOM Data Set" management facility.
BOM Data Sets are data objects stored in the Omnify database that can be used when importing BOMs using the Omnify Desktop BOM Import Wizard.
BOM Data Sets provide a manner that BOM data can be stored in the system without the need to manage individual BOM files when importing BOMs into Desktop from other sources.
When uploading a BOM to the Omnify database, OmniBOM will create a BOM Data Set that can then be used by the BOM Import Wizard in Desktop.
To upload a BOM to Desktop from OmniBOM, select the Upload to Omnify command from the File menu or toolbar.
This will invoke the Upload to Omnify Wizard.
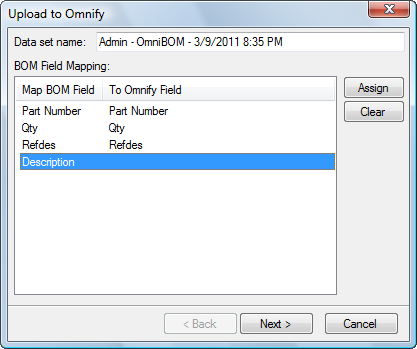
On the first page of the Upload to Omnify Wizard you will map the current BOM field to Omnify BOM fields.
OmniBOM will attempt to automatically map the fields upon initialization.
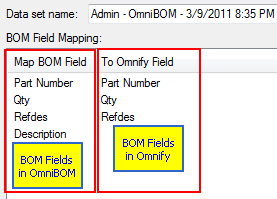
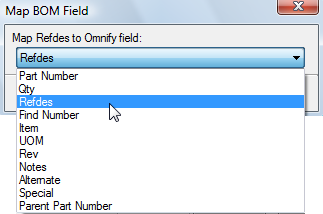
To map a field, first select the field and then click the Assign button.

From the Map BOM Field dialog box, you can select the BOM field that you wish to map the OmniBOM field to.
To clear a mapped field, first select the field and then click the Clear button.

You will also need to specify a Data Set name.
This name will be displayed in the BOM Import Wizard (Omnify Desktop) when importing into Desktop.
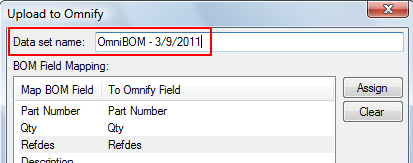
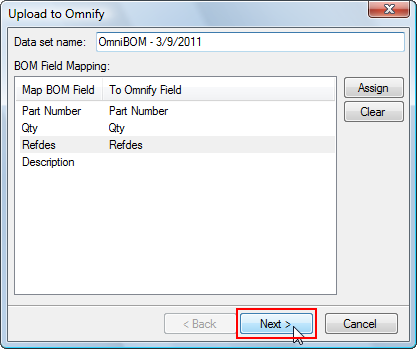
Once the Data set name is provided and the fields have been mapped, click the Next > button to advance to the next page of the wizard.
The last page of the Upload to Omnify Wizard allows you to select how the data will be assigned in Omnify.
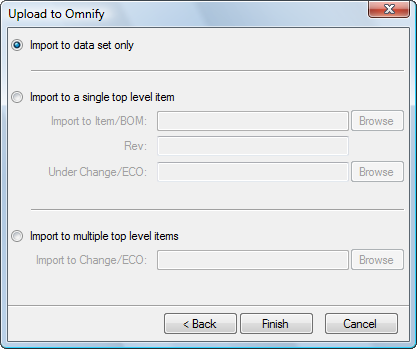
You will have 3 options:
| Import to data set only |
Imports the OmniBOM data directly to a data set. You can then decide how/when the data is assigned in Omnify. |
| Import to single top level item |
Imports the OmniBOM data directly to the Omnify BOM item/part number specified.
You can also have this import create changes/redlines to the BOM and assign them to a specific Change/ECO.
|
| Import to multiple top level items |
This option will only be available when a "Part Number" column is mapped to an OmniBOM field (on the first page of the Wizard).
Selecting this option will assign all parent BOM items as affected items to the specified Change/ECO.
|
Select this option if the Parent item or Change/ECO has not been created, or you would just like to import the data at a different time.
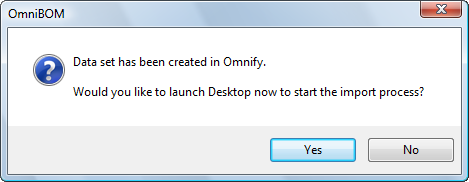
The Data Set created by OmniBOM will be available in the BOM Import Wizard (Omnify Desktop).

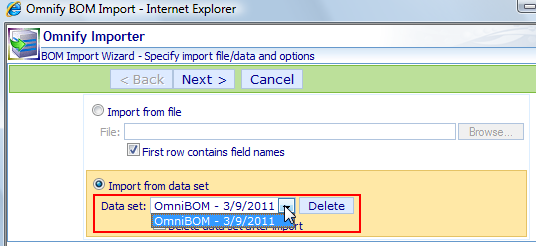
If you select this option, OmniBOM will ask you if you would like to launch Desktop after the Data Set has been created.
Selecting this option allows you to select the BOM/parent item that the BOM will be assigned to.
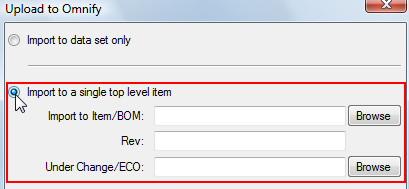
You will need to specify the item part number.
You can click the Browse to search the database for the part number.


You can optionally specify a Change/ECO that the import will be applied to.
When the data is imported, the system will automatically determine what changes will be made to the BOM.
If a Change/ECO is specified, the system will apply these changes as redlines under the specified Change/ECO.
This option will only be available when a "Part Number" column is mapped to an OmniBOM field (on the first page of the Wizard).
Selecting this option allows you to specify a Change/ECO that all BOM changes and parent items will be assigned to.
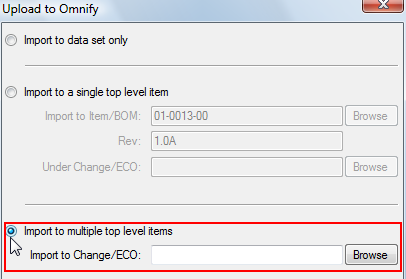
If this option is selected, you must specify an existing Change/ECO.

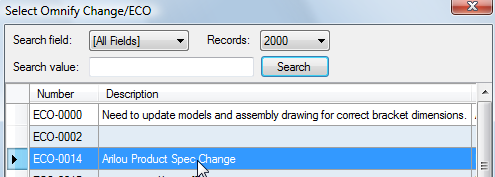

If this option is selected, the system will read all top level BOM items (specified in the mapped "Parent Part Number" column) and assign those items as affected items to the Change/ECO.
The system will then assign any BOM changes as redlines to the affected items automatically.
Refer to the Omnify Desktop BOM Import Wizard section of the Omnify Desktop User's Guide for more information on importing BOMs.
|
 |
Omnify BOM Data Sets |
Top |
|
The Omnify database provides a "BOM Data Set" management facility.
BOM Data Sets are data objects stored in the Omnify database that can be used when importing BOMs using the Omnify Desktop BOM Import Wizard.
BOM Data Sets provide a manner that BOM data can be stored in the system without the need to manage individual BOM files when importing BOMs into Desktop from other sources.
OmniBOM can automatically create these data sets using the Upload to Omnify command described in the previous section.
OmniBOM can also open and modify any stored data set in the Omnify database.
To open an Omnify BOM Data Set, select the Open DataSet command from the File menu.
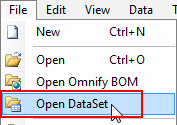
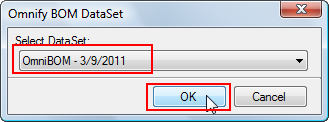
This will invoke the Omnify BOM DataSet dialog box and display a list of available Data Sets.
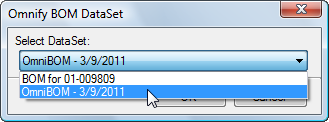
Once you have selected the data set, click the OK button to open the Data Set in OmniBOM.

Once the Data Set has been modified, you can Upload it again using the methods defined in the previous section.
Refer to the Omnify Desktop BOM Import Wizard section of the Omnify Desktop User's Guide for more information on importing data sets in Desktop.
|
|