|
|
| Overview |
In addition to representing parts, documents, software components, etc. an Item can also represent a Bill of Material (BOM).
The Parts List page of the item form will list all "child items" and levels of the BOM.

The system will inherently manage/display all "levels" of the BOM.
BOMs can be created:
- Interactively - From any search or open window you can Copy & Paste items into the BOM window.
- Import from a BOM file - Import from any BOM file format (ASCII, Excel, etc.).
Child items of a BOM can be defined as one of the following types:
| Standard Item |
Item will be represented in all BOMs and can have multiple quantities |
| Reference Item |
Item will be represented in all BOMs and always has a Quantity of 0 |
| Disabled Item |
Item will appear in Flat View only and can optionally be exported (separate list) to reports |
|
 |
Parts List/BOM Page |
Top |
|
The Parts List Page contains the following sections:

| Toolbar |
Quick access to common BOM/Parts List functions |
| Parts List/BOM Items |
Current listing of child items of the BOM, displays full BOM hierarchy |
The Parts List toolbar contains the following commands:
 |
Add an item to the BOM |
 |
Import BOM from file |
 |
Export BOM to a file |
 |
Remove checked/all BOM items |
 |
Copy checked items to session buffer |
 |
Paste items to BOM |
 |
Reset item numbers |
 |
Check for refdes and quantity issues |
 |
Expand all BOM item levels/hierarchy |
 |
Collapse all BOM item levels/hierarchy< |
For each child item that contains a BOM/Parts List an expansion button will appear on the left side of the list.
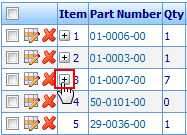
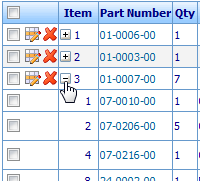
Clicking on the expansion button will display the BOM for that item.
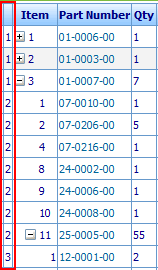
Using the User Preferences you can include a "Level" column on the BOM list to indicate the level of hierarchy for each item.
The system will initially display the BOM sorted by the Item/Sequence field.
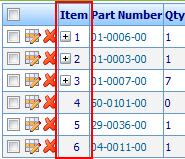
You can sort on any field by clicking the column header.
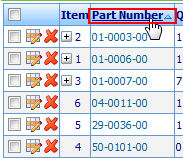
|
 |
BOM Column/Field Display |
Top |
|
The Parts List Page can be configured to show or hide standard BOM fields as well as item data fields, attributes, and vendor item data.
To configure the columns/fields of the BOM list, select the BOM Options section from the User Preferences form.

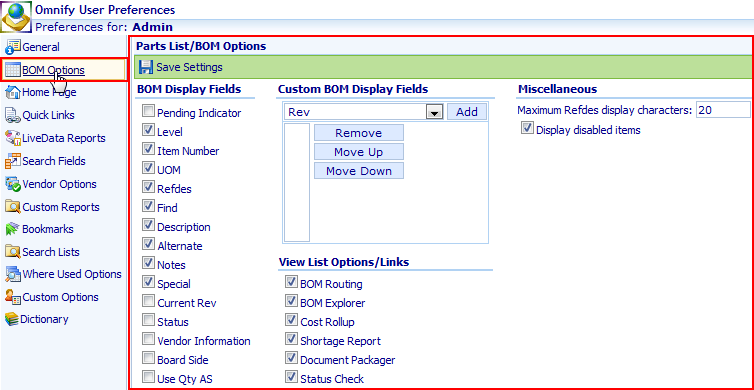
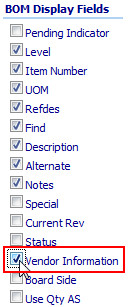
To show/hide standard BOM fields, you can check/uncheck the fields in the BOM Display Fields list.
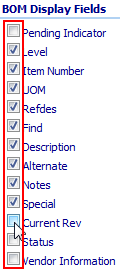
The BOM Display Fields list contains the following fields:
| Pending Indicator |
Display icon for all pending BOM items |
| Level |
Indicates level of hierarchy for each item |
| Item Number |
Item/sequence numbers |
| UOM |
Unit of Measure field |
| Refdes |
Reference designators |
| Find |
Find/Balloon number |
| Description |
Item description |
| Alternate |
Lists BOM Item alternates |
| Notes |
Additional text field for BOM items |
| Special |
Indicate Standard, Disabled, and Reference Items |
| Current Rev |
Lists the item's current revision |
| Status |
Lists the current item status |
| Vendor Information |
Includes vendor items list for each BOM item |
| BOM Attribute Fields |
Lists all enabled BOM attribute fields (Omnify Administrator) |
To include item fields (General, Attributes, etc.) in the BOM list, select the desired field from the Custom BOM Display Fields drop list.
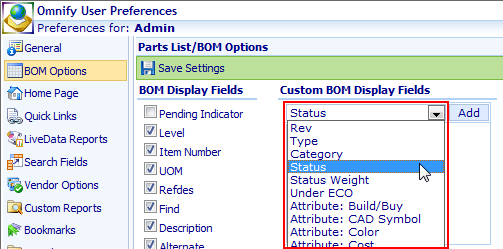
Then click the Add button.
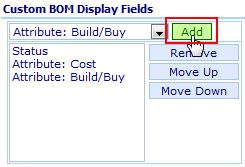
The fields specified in the Custom BOM Display Fields will appear as columns in the BOM list.

You can display the associated vendor items in the BOM list by checking the Vendor Information option in the BOM Display Fields list.

BOM Items contain a standard property to indicate the Unit of Measure (UOM).
The UOM field can be assigned on a per BOM item basis.
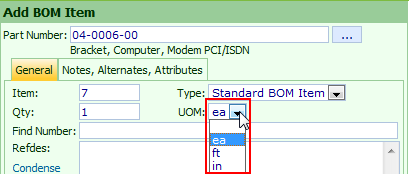
Unit of Measure values are created in the Omnify Administrator.
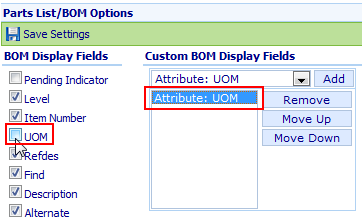
If you would prefer to manage the Unit of Measure as an Item attribute field, you can uncheck the UOM field from the BOM Display Fields and add the attribute to the Custom BOM Display Fields list.
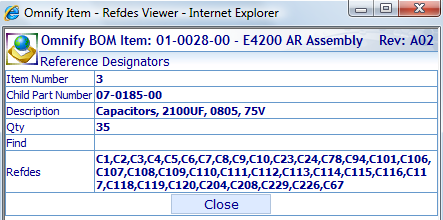
Reference designator field lengths can contain a large number of characters.

You can configure the system to display only a certain number of characters and provide a popup window to display the entire content (and minimize the column size).
To set a maximum number of display characters, set the max number in the Maximum Refdes display characters option (User Preferences).

The Refdes field will contain a link for those items whose length exceeds the setting.

Selecting the hyperlink will display the full refdes field.
|
 |
Interactive BOM Creation |
Top |
|
You can add items to a BOM interactively using any of the following techniques:
| • | Click the Add button from the BOM toolbar |
| • | Copy & Paste from any existing BOM window |
| • | Copy & Paste from any item form |
| • | Copy & Paste from the Database Search form |
Refer to the Importing section for information on importing BOMs from Text, Excel, OmniBOM, etc. files.
To add an item to a BOM, click the Add button from the BOM toolbar.
This will invoke the Add BOM Item dialog box.
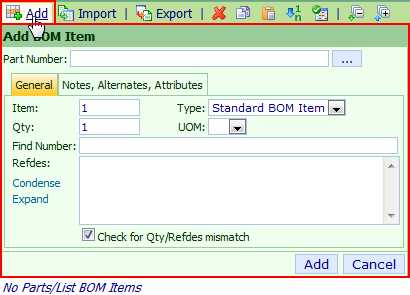
To specify the item you wish to add, you can either type the part number in the Part Number field:

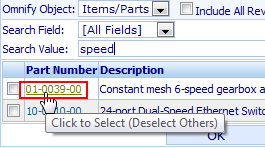
Or search/browse for the item using the Browse (...) button.

Clicking the Browse button will invoke the Object Search form.
From the Search form you can search on main field keywords (part number, description, rev, status, etc.).

You can select one or more items to add. To add a single item, click the hyperlink.
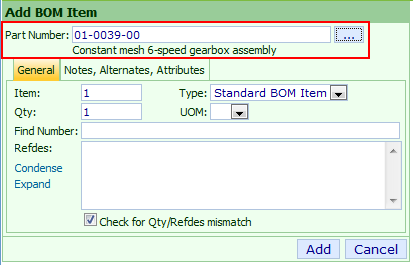
When adding only one item, the part number will be populated in the Add BOM Item dialog box.
To select multiple items, check the checkboxes of the desired items and then click the OK button.
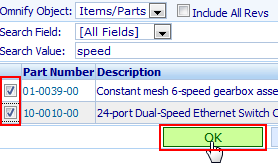
Note: when adding multiple items, the system will add the items as quantity 1 to the BOM directly without any other properties assigned.

You will then have to use the Edit operation to modify any necessary BOM item properties.
When assigning a single item, the Add BOM Item dialog box allows you to assign all BOM Item properties (Qty, Refdes, UOM, Find, attributes, etc.).
The Add BOM Item dialog box contains two tabs: General and Notes, Alternates, Attributes.

The General tab contains the following fields:
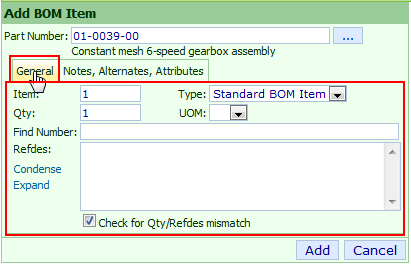
| Item |
Item/sequence number - the system will automatically assign or you can specify a numeric value |
| Type |
Select either Standard BOM Item, Reference Item, or Disabled Item |
| Qty |
Quantity (numeric or decimal values) |
| UOM |
Unit of Measure - values defined in Administrator |
| Find Number |
Find/Balloon/Drawing Reference number |
| Refdes |
Reference designators |
The Notes, Alternates, Attributes tab contains the following fields:
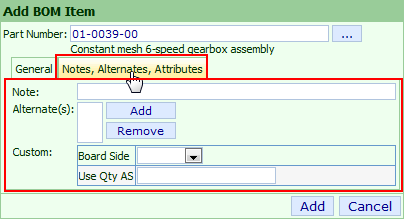
| Note |
Additional text/note field for BOM item |
| Alternate(s) |
Alternate BOM items |
| Custom |
Custom fields/attributes - define in Administrator |

The Item field represents a sequence number.
This field must be a numeric value.
The field will automatically be set by the system (next sequential number) or can be assigned.
The system will initially display the BOM sorted by the Item/Sequence field.
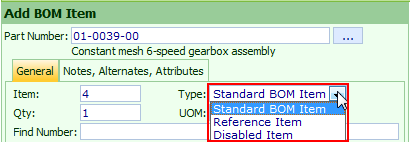
Child items of a BOM can be defined as one of the following types:
| Standard Item |
Item will be represented in all BOMs and can have multiple quantities |
| Reference Item |
Item will be represented in all BOMs and always has a Quantity of 0 |
| Disabled Item |
Item will appear in Flat View only and can optionally be exported (separate list) to reports |

The Quantity field can be either a whole number or decimal.
Fractional quantities (e.g. 1/4) will be converted to decimal values automatically.
When adding or editing items, the system can check the quantity and reference designator counts to identify a mismatch.
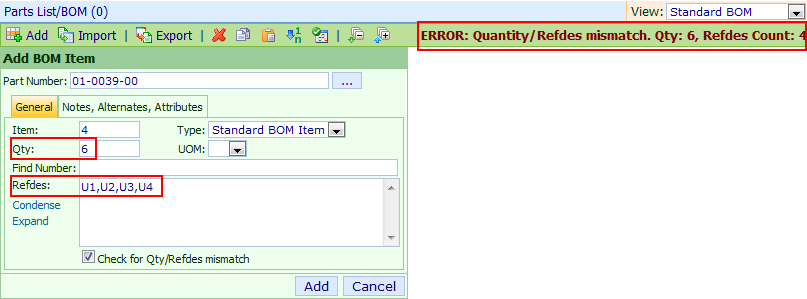
Note: changing the Quantity field to 0, will automatically change the Type to Reference Item.
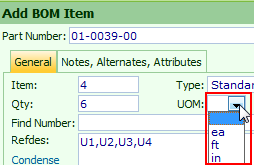
The UOM field represents the unit of measure for BOM item quantities.
UOM types are defined in the Omnify Administrator and will appear as a drop list.
UOM field can be read from an attribute assigned to the item.
Refer to the BOM Fields section for more information on using an item attribute as opposed to the BOM Item property.
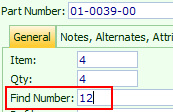
The Find Number field can represent the Find or Balloon number on a CAD drawing or any other unique identifier you wish to use.
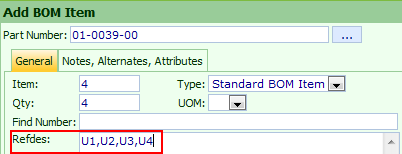
A reference designator provides a unique identifier for a component in an electrical schematic (circuit diagram) or on a printed circuit board (PCB).
The reference designator usually consists of one or two letters followed by a number, e.g. R13, C1002.
The number is sometimes followed by a letter, indicating that components are grouped or matched with each other, e.g. R17A, R17B.
Multiple reference designators can be delimited with commas (i.e. C1,C2,C3 ) or with dashes (i.e.: C1-C3 or C1-3).
The Add BOM Item dialog provides Expand and Condense functions to display the string full expanded or by contiguous number groups.

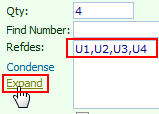
When adding or editing items, the system can check the quantity and reference designator counts to identify a mismatch.


The Note field provides an open text field for additional clarification, instructions, etc.
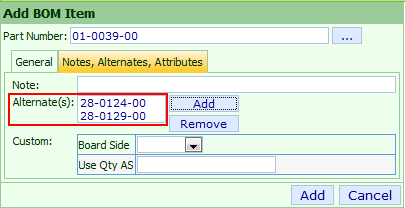
Alternate items can represent items that can replace the specified BOM item.
To add an alternate, click the Add button.

This will invoke the Object Search form.
From the Search form you can search on main field keywords (part number, description, rev, status, etc.).

You can select one or more items to add. To add a single item, click the hyperlink.

To select multiple items, check the checkboxes of the desired items and then click the OK button.

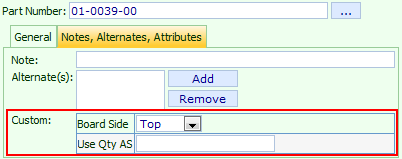
Custom BOM fields can be enabled/defined in the Omnify Administrator.
Fields can be either open text fields or pick list values.
You can copy and paste BOM items from:
| • | Existing BOM windows |
| • | Item form |
| • | Database Search form |
To copy items from an existing BOM, check the actions checkbox, and then click the Copy toolbar button.
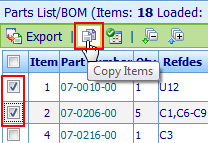
To paste the items to the BOM, return to the target BOM and click the Paste toolbar button.
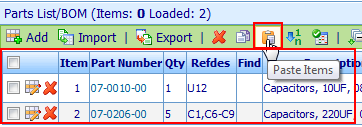
Note: when pasting BOM items all properties (Qty, Refdes, Find, etc.) will be copied.
To copy from an Item form, click the Copy icon from the item banner.

To paste the item to the BOM, return to the target BOM and click the Paste toolbar button.

Note: when pasting an item from the banner or search forms, the quantity will be set to 1 and all other properties will be blank.
To copy from a search form, check the desired items and click the Copy toolbar button on the database search form.
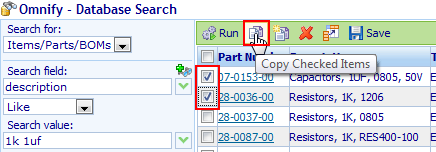
To paste the item to the BOM, return to the target BOM and click the Paste toolbar button.

Note: when pasting an item from the banner or search forms, the quantity will be set to 1 and all other properties will be blank.
|
 |
Importing BOMs |
Top |
|
The Desktop BOM Importer allows you to import files from various file formats:
- OmniBOM
- Text/ASCII
- Excel
- XML
- Etc.
You can import files directly from Engineering (CAD/CAE) tools such as Cadence
OrCAD, Mentor ViewDraw, SolidWorks, PTC ProEngineering/ProInterlink, etc.
To import a BOM file, click the Import toolbar button.

The BOM Import Wizard will appear.
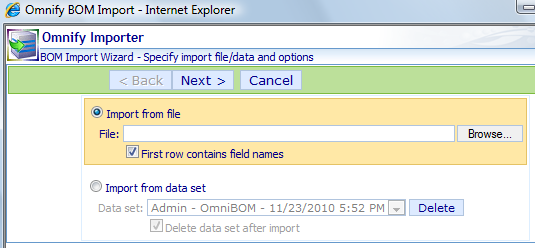
The first page of the BOM Import Wizard allows you to specify the BOM source.
You can import from either a file or "Data Set".
"Data Sets" can be created by OmniBOM, CADKit, and the BOM Import Wizard and eliminate the need to upload files.
To import a Data Set, click the Import from data set option.
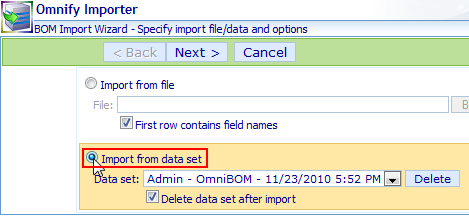
Then select a data set from the drop list.

You can delete data sources by selecting the source and then clicking the Delete button.
You will be asked to verify the removal.
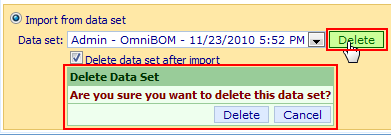
You can have the system delete the data set automatically once the import is complete by checking the Delete data set after import.

To import from a file, click the Import from file option.

You can then browse for the BOM file to import.

For Excel files, if the BOM contains the field names on the first row check the First row contains field names option.

For example, if the source looked like:

You would check the First row contains field names option.
Once the source has been identified, click the Next > button.

The Source Preview page will display the data to be imported.
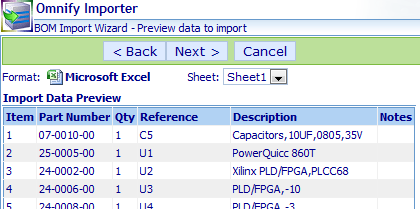
For source files that may contain multiple "sheets" (such as Excel and OmniBOM), the Sheet drop list will list all sheets.

You can select any sheet to import.
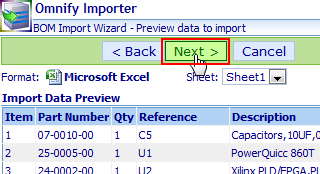
Once the correct sheet is selected, click the Next > button.
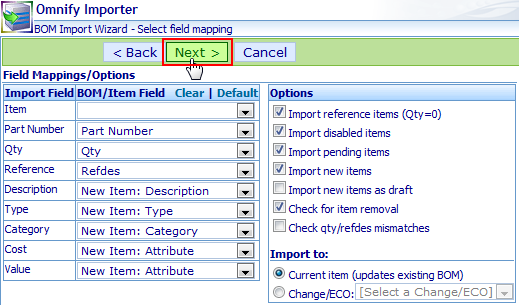
The Field Mapping and Options page will display the source fields and import options.
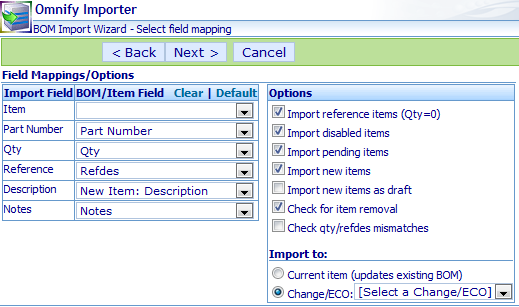
The Field Mapping list will display the fields found in the imported file.
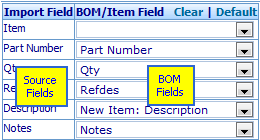
Each field will contain a drop list that will allow you to map the imported data field to a specific BOM field.
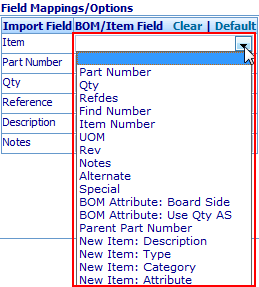
The BOM Field list will contain the following fields:
| Part Number |
Required |
Specifies the child part number column in the BOM file |
| Qty |
Optional |
Specifies the Quantity column in the BOM file |
| Refdes |
Optional |
Specifies the Reference Designator column in the BOM file |
| Find Number |
Optional |
Specifies the Find/Balloon number column in the BOM file |
| Item Number |
Optional |
Specifies the Item/Sequence Number column in the BOM file |
| UOM |
Optional |
Specifies the unit of measure column in the BOM file |
| Rev |
Optional |
Specifies the child revision column in the BOM file |
| Notes |
Optional |
Specifies the BOM item notes column in the BOM file |
| Alternate |
Optional |
Specifies the alternate parts column in the BOM file |
| Special |
Optional |
Indicates Standard, Disabled, or Reference item
Note: All items will default to Standard items, to indicate a disabled or reference item, use keywords: Disabled or Reference for this field.
Any item with a Quantity of 0 will automatically be set to a Reference item.
|
| BOM Attribute |
Optional |
Specifies a column in the BOM file that maps to one of the enabled user-defined BOM attribute fields |
| Parent Part Number |
Optional |
Specifies the Parent Part Number column when importing Hierarchical BOMs.
Note: if this field is mapped, the system will use the Hierarchical BOMs import process.
|
| New Item: Description |
Optional |
For new items (part numbers not specified or found in the database) this field will map to the new item's Description field. |
| New Item: Type |
Optional |
For new items (part numbers not specified or found in the database) this field will map to the new item's Type field. |
| New Item: Category |
Optional |
For new items (part numbers not specified or found in the database) this field will map to the new item's Category field. |
| New Item: Attribute |
Optional |
For new items (part numbers not specified or found in the database) this field will map to the new item's Attribute (specified) field. |
When importing a BOM, you will have the following options:
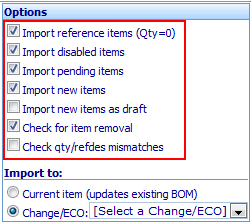
| Import reference items (Qty=0) |
Import or ignore (uncheck) Reference (Qty = 0) items |
| Import disabled items |
Import or ignore (uncheck) disabled items |
| Import pending items |
Import or ignore (uncheck) items that are not released |
| Import new items |
Import or ignore (uncheck) BOM import items that do not exist in the database |
| Import new items as draft |
When importing new items check this option for the items to be assigned a "Draft" status |
| Check for item removal |
If this option is checked, the system will remove items from the existing BOM structure that are not found in the import source |
| Check qty/refdes mismatches |
Checks for quantity and reference designator count mismatches |
When importing from the Item form (as opposed to the Change/ECO form), you will be able to define where the changes are to be applied.

To import to the current item, select the Current item (updates existing BOM) option.

To import the BOM (and changes) to a Change/ECO form, select the Change/ECO: option and then select the target Change/ECO number.
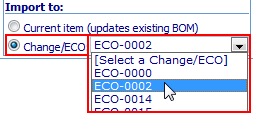
When importing a BOM file, you will have the option to import items that do not already exist in the Omnify database.
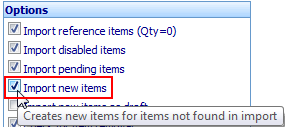
If this option is enabled, the BOM import will create parts for part numbers specified in the import file that do not already exist in the system.
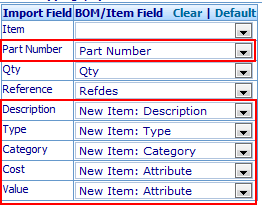
The BOM import will also create items and assign part numbers for items that are left blank in the import file.
You can identify import columns that can be mapped to item data fields to be
applied to new items that are created by the import process.
Once all fields and options have been assigned, click the Next > button.
The last page of the BOM Import Wizard will display all of the changes found between the import BOM source and the current BOM structure.
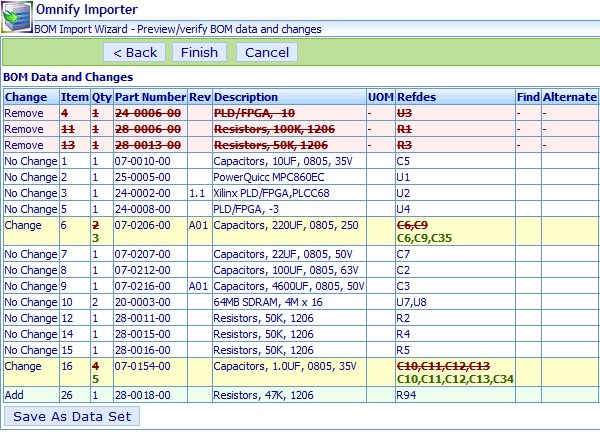
When importing a hierarchical BOM, the system will provide a filter for you to view the change for all or specific BOM/Parent items.

The final page will allow you to save the imported BOM data to a data set. To save the data to a data set, click the Save As Data Set button.
This will present the Save As Data Set dialog box where you can specify a data set name.
Click the Save button to save the data set.

Note: you can modify data sets in OmniBOM.
To import the BOM and/or Changes to the item or selected Change/ECO, click the Finish button.
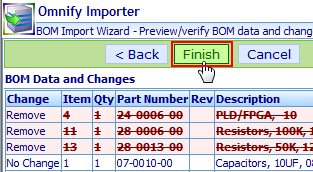
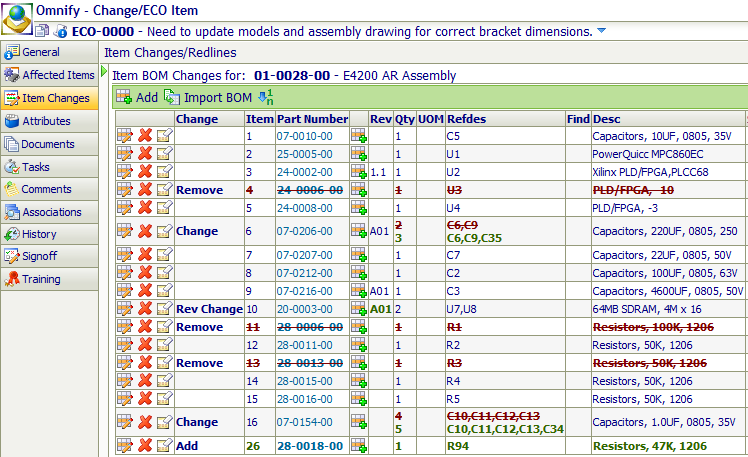
If the Import to Change/ECO option is specified, the parent items will be added as affected items and the BOM changes will automatically appear in the Redlines view for the BOM.
|
 |
Importing Hierarchical BOMs |
Top |
|
When importing a Bill of Material, you can specify a BOM Parent Part Number column/field.
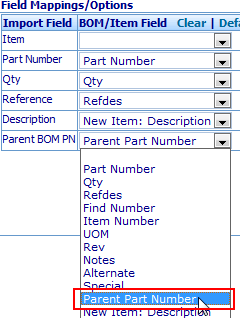
This option allows you to import a hierarchical BOM where the input file contains more than one Parent/Top Level BOM item.
For example, an imported file contains the following format:
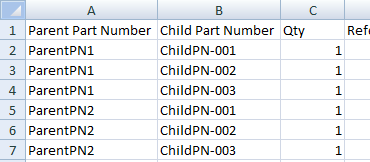
When imported, Desktop would recognize that there are 2 separate BOMs included
in the file: ParentPN1 and ParentPN2.
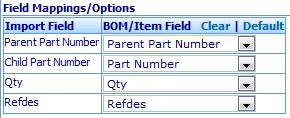
When the Parent Part Number field is mapped to a field in the
import file, the next page of the Import Wizard will display each parent item
found and the number of records for each BOM.

|
 |
Editing BOM Items |
Top |
|
You can interactively modify BOM items by clicking the Edit icon in the Actions column.

This will display the Edit BOM Item dialog box.
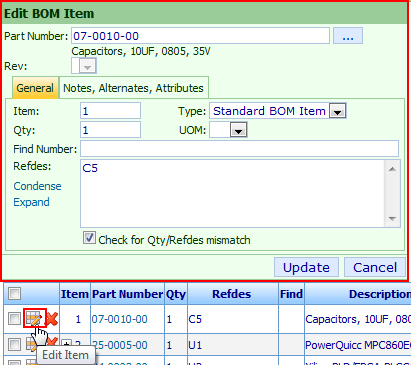
The Edit BOM Item dialog box allows you to assign all BOM Item properties (Qty, Refdes, UOM, Find, attributes, etc.).
The Edit BOM Item dialog box contains two tabs: General and Notes, Alternates, Attributes.

Refer to the Interactive BOM Creation section for more information on the BOM Item fields.
|
 |
Replacing BOM Items |
Top |
|
To replace a BOM item, click the Edit icon in the Actions column.

This will display the Edit BOM Item dialog box.

To replace the item, you can either type the new part number or use the browse (...) button.

Clicking the Browse button will invoke the Object Search form.
From the Search form you can search on main field keywords (part number, description, rev, status, etc.).

Once you have found the desired item click the hyperlink to assign the new part number.
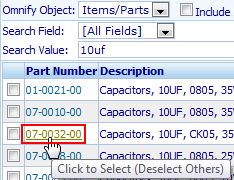

Click the Update button to replace the item.

For BOM items that contain multiple revisions, you can change the revision by editing the item and selecting the desired revision from the Rev drop list.

|
 |
Editing Item Numbers |
Top |
|
Desktop will automatically manage item numbers on the Bill of Material, however
you can interactively change the item number or a child item using the Edit BOM item dialog box.
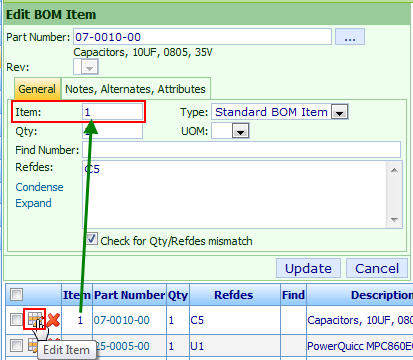
You can also have Desktop automatically number/re-number.
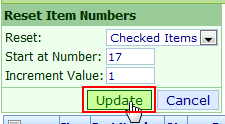
To reset item numbers, use the Reset Item Numbers command from the Actions menu.
This will display the Reset Item Numbers dialog box.
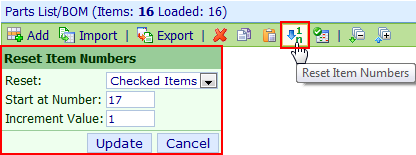
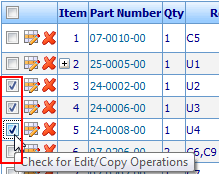
When re-numbering, you update all or checked items.

If you are updating the checked item, you must check the desired items using the Actions column checkbox.
When renumbering, you can specify the starting number as well as an increment value.
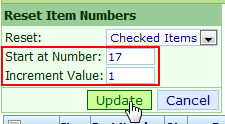
To reset the item numbers, click the Update button.
|
 |
Removing BOM Items |
Top |
|
To delete an item on the BOM, click the Remove icon in the Actions column.
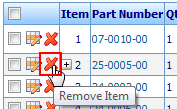
You will be asked to verify the removal.
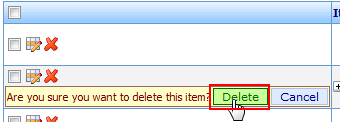
To delete multiple items, you must check the desired items using the Actions column checkbox.

Clicking the Remove toolbar button will display the Remove BOM Items dialog box.
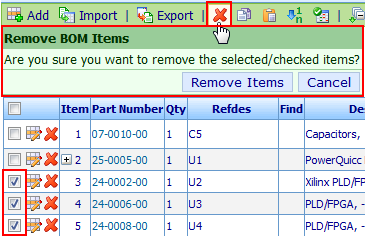
To delete the checked items, click the Remove Items button.

|
 |
Finding Items |
Top |
|
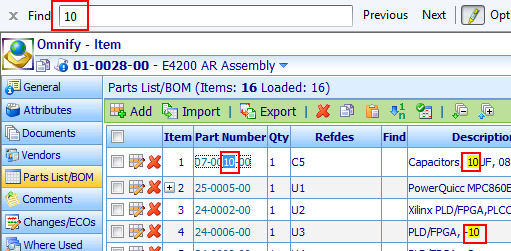
To find items on a BOM, you can use the browser's "Find On Page" feature.
This is usually available from the application menus or by clicking the Ctrl + F button.
The "Find" feature will allow you to specify text to find and then highlight the matching areas.
|
 |
Disabled Items |
Top |
|
"Disabled Items" are BOM items that are not used for a particular revision or configuration of a BOM but can optionally be included in the BOM display and/or reports/exports.
The Special column will indicate "Disabled" items (when enabled).

To enable/disable the display of "disabled" items on the BOM list, check or uncheck the Display Disabled Items option on the BOM Option section of the User Preferences form.


The final page of the BOM Export Wizard (described below) allows you to include the disabled items as a separate list in the BOM report.

|
 |
Reference Items |
Top |
|
"Reference Items" are BOM items that appear in the BOM list as Quantity 0 items.
They typically represent items that are not physical items that are populated on a PC Board or included in a system, but items that still need to be tracked with BOM revisions.
Examples would include Software or Firmware components loaded in a system or End User Documentation/CDs that need to be shipped with a system.

|
 |
Exporting BOMs |
Top |
|
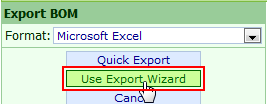
To Export a BOM, select the Export toolbar button.
This will display the Export BOM dialog box.
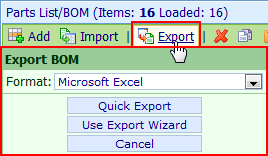
When exporting you can specify the following formats:
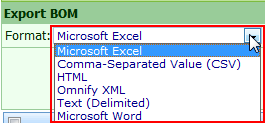
| • | Microsoft Excel - Microsoft Excel format (.xls, .xlsx) |
| • | Comma-Separated Value File - Text/Excel file format, viewed in Excel (.csv) |
| • | HTML File - HyperText Markup Language file, viewable in any Web browser (.htm) |
| • | Omnify XML File - Omnify Universal XML file format (.oxf) |
| • | Text (Delimited) - Tab-delimited ASCII file (.txt) |
| • | Microsoft Word - Microsoft Word document (.doc, .docx) |
When exporting you use either:
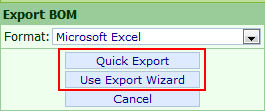
| • | "Quick Export" - Exports the current page ("as is") data |
| • | Use Export Wizard - Select an existing report or specify the fields and options to include in the report |
The "Quick Export" option will export the current BOM with all fields in the BOM List ("as is").
To run the "Quick Export", click the Quick Export button on the BOM Export dialog.

The BOM Export Wizard allows you to select from an existing report or customize the fields and options to be included in the export.
To start the BOM Export Wizard, click the Use Export Wizard button on the BOM Export dialog.
The BOM Export Wizard contains the following areas:

| Banner |
Displays the part number, description and current revision of the BOM item you are exporting |
| Page Navigator |
Allows you to jump to specific Export Wizard pages |
| Page Advance Toolbar |
Provides page advancement and report generation functions |
| Data Page Area |
Displays specific options for the selected data page |
The BOM Export Wizard provides 4 key data pages:

| Format/Report Page |
Allows you to select an existing report as well as the output format |
| Fields Page |
Allows you to select which fields will appear in the output |
| Vendor Data Page |
Allows you to select which (if any) associated vendor items will appear in the report |
| Options/Save Page |
Provides advanced output options, header/footer information, and allows you to create/save your own reports |
To advance through the pages you can use the < Back and Next > buttons.

You can jump to a specific page using the Page Navigator.

Once all fields and options have been specified, click the Finish button to create the report.

The Format/Report page allows you to select the output format.
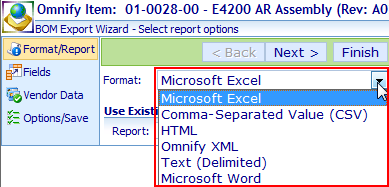
If you wish to export an existing report, select the report from the Use Existing Report drop list.

Note: selecting an existing report will automatically adjust the fields and options on all other data pages.
You can still modify the default report settings by navigating to the appropriate data page.
The Fields page of the Export Wizard allows you to select which fields will be included in the report.
You can select from the standard BOM fields (such as Refdes, Find, Alternates, Notes, etc.), item data fields (such as Status, Type, Attributes, etc.), and vendor item data (such as Vendor, Vendor Part Number, Vendor Item Attributes, etc.).
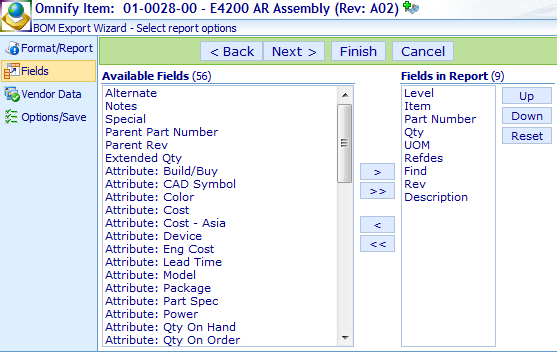
The Fields page contains 2 lists: Available Fields and Fields in Report.
The fields in the Fields in Report are the fields that will be included in the exported file.
To add fields to the report, select the desired field(s) in the Available Fields list and then click the > (Add) button.
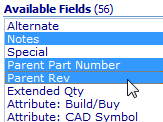
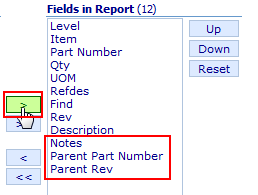
Note: you can add all fields using the >> (Add All) button.
To remove fields from the report, select the desired field(s) in the Fields in Report list and then click the < (Remove) button.
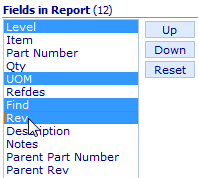
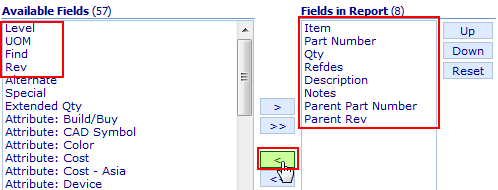
Note: you can remove all fields using the << (Remove All) button.
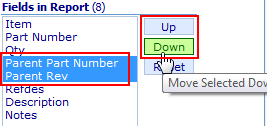
You can modify the order of the output fields by selecting the desired field(s) in the Fields in Report list and then using the Up and Down buttons.
If you are including Vendor item fields in the output, the Vendor Data page allows you to provide additional vendor options/filters.
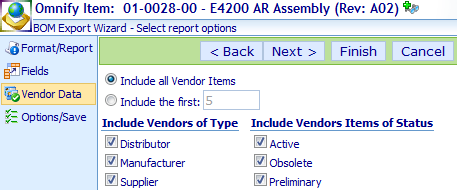
You can determine how many vendor items are included by selecting the Include all Vendor Items or Include the first option.

The Include Vendors of Type and Include Vendors Items of Status lists allow you to remove vendor items that do not meet the defined criteria.
The Options/Save page allows you to define the following options:
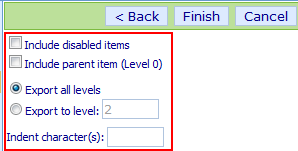
| Include disabled items |
If checked, the report will include disabled items |
| Include parent item (Level 0) |
If checked, the report will include the BOM item (parent) as the first line item in the report |
| Export all levels |
If checked, the report will include all levels of hierarchy in the BOM |
| Export to level |
If checked, the report will only include hierarchy for items that are at or less than the indicated level |
| Indent character(s) |
A text string can be provided to indicate the level of hierarchy. For each level count, the indent character will be repeated. |
The Options/Save page allows you to define a header and footer for the report.
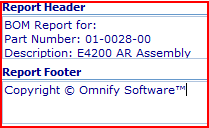
Clicking the Add As Header icon on the Wizard banner will add the Part Number, Description, and Rev to the Header text.
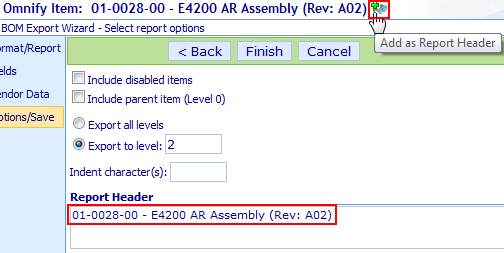
To create a BOM Report, click the Save Settings button.
This will display the Save Settings dialog box.
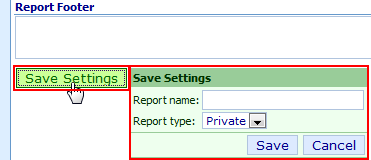
From the Save Settings dialog box, specify a report name and select the type (Public or Private).

Click the Save button to create the report.
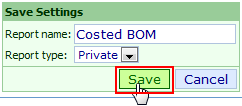
The saved report will now appear in the Use Existing Report drop list.

Once all fields and options have been specified, click the Finish button to create the report.

The browser will ask you to download the file.
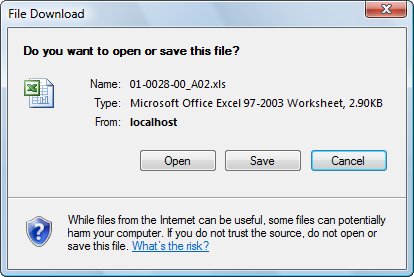
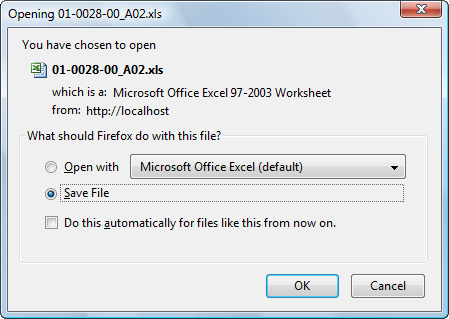
A confirmation page will be displayed after the report has been created.

From the confirmation page you will be able to close the wizard or generate another report.
|
 |
Standard BOM Reports |
Top |
|
The View drop list can be configured to include standard BOM reports.
To configure the View menu, launch the BOM Options section of the User Preferences form.

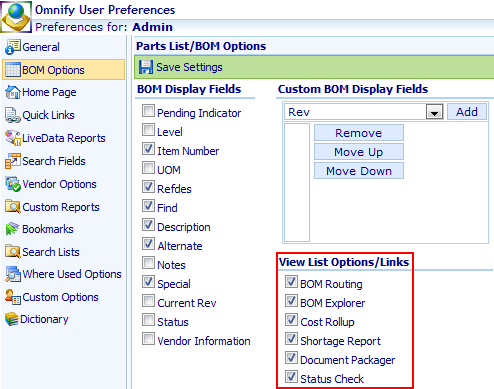
The options enabled in the View List Options/Links section will appear in the View drop list.

The View drop list contains the following options/reports:
| Standard BOM |
Standard |
Default BOM View (with user configured columns/data) |
| Compare BOM |
Standard |
Opens the Compare form |
| BOM Routing |
Optional |
Opens the BOM in the BOM Routing Module |
| BOM Explorer |
Optional |
Opens the BOM in the BOM Explorer Report |
| Cost Rollup |
Optional |
Opens the BOM in the Cost Rollup Report |
| Shortage Report |
Optional |
Opens the BOM in the Shortage Report |
| Document Packager |
Optional |
Opens the BOM in the Document Packager Report |
| Status Check |
Optional |
Opens the BOM in the Status Checker Report |
| Vendors/Suppliers |
Standard |
Opens the BOM in the Reporter and displays all Vendor Items and associated supplier items for each item on the BOM |
|
 |
BOM Routing |
Top |
|
The BOM Routing module provides you with a method of documenting manufacturing, assembly, and/or test procedures for any product (BOM).
The BOM Routing module allows you to define operations/stages, steps/sequences, and manufacturing areas/machine information. For each operation and step/sequence BOM items can be used to indicate which parts/products are consumed at that given stage.
You can launch the Routing module directly from the Parts List page (View drop list).

This will automatically log you into the Routing module and open the BOM directly.
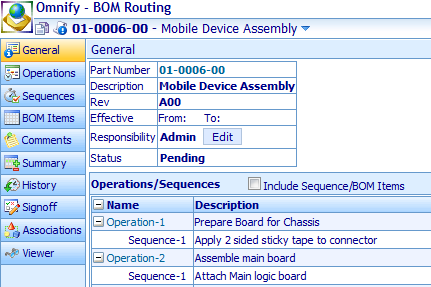
Refer to the BOM Routing User's Guide for more information on the BOM Routing module.
|
|