|
|
| Overview |
Item, Change/ECO, Project, and CAPA object signoffs are managed/controlled through signoff workflows.
Signoff workflows are comprised of a set of signoff "stages".
 |
When objects are requested, the system can automatically assign (or the user can interactively create) a signoff workflow.
Automatic workflow assignment can be based on a number of "conditions".
Refer to the Workflow Mappings section for more information on conditional workflow assignments.
Workflows can contain one or more workflow stages.
A Signoff stage can contain one or more users who are required to sign or review.
During each signoff stage, user approvals or rejections can be processed in parallel.
Once all required users (signers) approve the request, the next stage will be activated.
Each signoff stage of the workflow can contain a "Reject Stage".
If one person on an active stage rejects the Item/Change, the system can re-activate the "Reject" stage.
All previous signatures will be cleared.
Once all required users and stages have been approved, the Item/Change will then be available for "release".
|
Each signoff stage can contain an unlimited number of users.
Users can be defined as:
- Required - User must approve or reject the request
- Reviewer - User does not need to approve or reject the request, but will receive email notices, etc.
Signoff stage users can be assigned at a "Stage" level or at a "Workflow Mapping" level.
Users assigned at a "Stage" level will represent default users for that stage.
You can modify the user list when you define a "Workflow Mapping".
Assigning users at the "Workflow Mapping" level allows you to create "generic" workflows that consist of blank/empty signoff stages, and then define the users that should be applied to the workflow stages based on "conditions" (field values assigned to Item, Change, etc. forms).
|
 |
Page Navigation |
Top |
|
The Workflow Mappings page allows you to define workflow mappings, define the map conditions, and set the default users for each stage.
The page consists of the following areas:

| Map Functions |
Select Maps for editing, create/remove workflow maps |
| Stage User Assignment |
Workflow stages and users |
| Conditions |
Displays a list of field conditions that will dictate when the map is used |
| General Information |
Displays selected map settings (workflow, object type, etc.) |
|
 |
Adding Workflow Maps |
Top |
|
To add a workflow map, click the Add Map toolbar button.

When adding a Map you can specify the following:
| Name |
Workflow map name/label |
| Description |
Description of workflow map |
| Type |
| Item Workflow |
Map can be used by Items |
| Change/ECO Workflow |
Map can be used by Changes/ECOs |
| Quality/CAPA Workflow |
Map can be used by Quality/CAPA items |
| Project Workflow |
Map can be used by Projects |
| BOM Routing |
Map can be used by BOM Routings |
|
| Workflow |
Select a workflow to assign |
| Copy from map |
Checking this option allows you to copy the workflow, users, and conditions from an existing map. |
To create the workflow, specify the name and click the Add Map button.
|
 |
Removing Workflow Maps |
Top |
|
To remove a workflow map, first select the workflow map from the drop list.

Then click the Remove Map toolbar button.
You will be asked to verify the removal.

|
|
|
To modify the conditions for a workflow map, first select the workflow map from the drop list.

The conditions section will display the current field conditions for the workflow map.

To modify the field conditions, click the Edit hyperlink in the Conditions section.

This will display the Workflow Conditions dialog box.
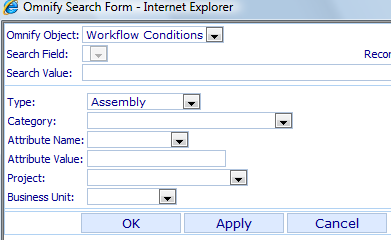
When defining "Conditions" each field drop list will display the available values for the selected field.
Each condition on the workflow map is assigned a different weight.
The different weights allow the system to determine the best map to be used when multiple "conditions" are assigned to an item.
The conditions weights/priorities are described in the following table.
| Type |
Lowest |
Lowest |
Lowest |
Lowest |
| Category |
Higher Than Type |
N/A |
N/A |
N/A |
| Attribute Name and Value |
Higher Than Category |
Higher Than Type |
Higher Than Type |
Higher Than Type |
| Project |
Higher Than Attribute |
Higher Than Attribute |
Higher Than Attribute |
N/A |
| Business Unit |
Higher Than Project |
Higher Than Project |
Higher Than Project |
Higher Than Attribute |
Once the desired field options are selected click the OK or Apply buttons to assign the conditions to the map.
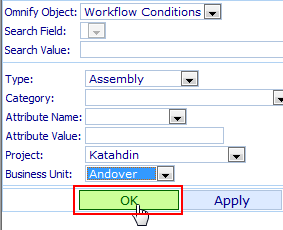
The conditions list will update to display the map conditions.

|
 |
Stages/Users |
Top |
|
To modify the users for a workflow map, first select the workflow map from the drop list.

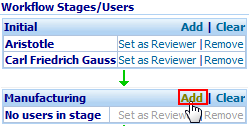
To add users to a workflow stage, click the Add hyperlink on the desired stage.
From the User Search form, select the desired user by checking the Select checkbox, and then click the OK or Apply button.
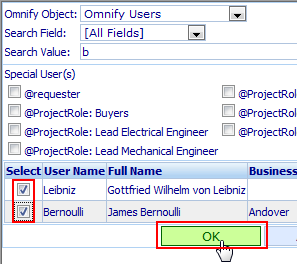
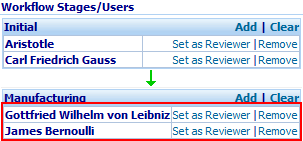
To remove a stage user, click the Remove hyperlink.

Stage users can be either:
- Required - User must approve or reject the request
- Reviewer - User does not need to approve or reject the request, but will receive email notices, etc.
To toggle between a reviewer and required user, click the Set as Required or Set as Reviewer hyperlinks.

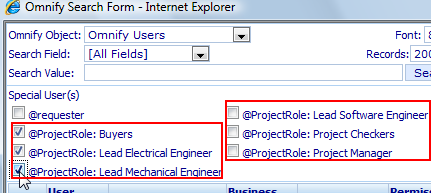
When adding users to a stage, you will have the option to select specific users, the requester, and users assigned to Project Roles.
The @requester keyword will be replaced by the user requesting the object.
You can find the @requester in the Special User(s) section, when adding users to the stage.

When defining users for signoff stages you can now use Project Role indicators. For each Role defined in the Administrator, a Project Role indicator will be listed among the users when assigning signoff users.
You can find the project role users in the Special User(s) section, when adding users to the stage.
|
|