| Overview |
The Status page allows you to modify the following types:
- Item Status
- Vendor Status
- Vendor Item Status
- Training Status
You can change the data set by selecting an available option in the drop list.

|
 |
Modifying Status Options |
Top |
|
To add a new status option, first select the object type you wish to create.

Next, click the Add Status button.
The New Status dialog box will appear.

From the New Status dialog box, specify the name and description and click the Apply or Add button.

To remove a status option, first select the type you wish to remove.

Next, click the Remove hyperlink from the Actions column.

Note: When deleting certain objects, the system will "disable" them rather than deleting the database record.
You can configure the Administrator to display "disabled".

"Disabled" items can be enabled by clicking the Enable hyperlink.

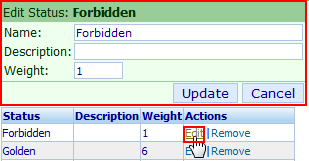
To edit a status option, first select the object you wish to modify.

Next, click the Edit hyperlink from the Actions column.
The Edit Status dialog box will appear.

Modify the desired settings and then click the Update button.
|
 |
Item Status |
Top |
|
The Item Status Options allow you to define a list of Status options that are used to define and classify the life cycle of an item.
These options will be available when defining the item in Omnify Desktop (General tab).
|
 |
Vendor Status |
Top |
|
The Vendor Status Options allow you to define a list of Status options that are used to define and classify vendors in the database.
These options will be available when defining/modifying a vendor (General tab).
|
 |
Vendor Item Status |
Top |
|
The Vendor Item Status Options allow you to define a list of Status options that are used to define and classify vendor items in the database.
These options will be available when defining a vendor item.
|
 |
Training Status |
Top |
|
The Training Status Options allow you to define a list of Status options that are used to define and classify training items in the database.
|
 |
Status Weights |
Top |
|
Item, Vendor Item, and Vendor Status fields can contain a "weight" property.
The "weight" is a numeric value that the system will use to apply various rules.
Status weight value is assigned when adding or modifying the status options.

The weight value can be used to determine which BOM child items can be assigned to their parent BOM items.

When items are added to a BOM, the system will evaluate the status weight of the parent item against the status weight of the child item and determine if the assignment will be allowed.
The Omnify Reporter includes a Status Weight report that will display all BOM child items, their weights, and identify potential issues (where the child item status is not at the same level as its parent BOM).
|