|
|
| Overview |
The Item Changes page lists all of the proposed changes for a Change/ECO.
Changes can be defined:
- Automatically - On operations such as BOM Imports and Part Replace (Where Used Page)
- Interactively - Using the Redline Tool.
Actions that you can perform to the affected items include:
- General Information Changes
- Revision, Release, Part Number, Description, Type/Category, Status, Projects, Business Units, Substitute Parts
- Attribute Changes
- Add/Modify/Remove Attributes
- Documents
- Vendor Changes
- Add/Modify/Remove Vendor Parts
- BOM Changes
- Add/Modify/Remove BOM Items
- Service Tag Changes
- Add/Modify/Remove Service Tags
|
 |
Item Changes Page |
Top |
|
The Item Changes Page contains the following sections:
- Affected Items/Page Navigator - Tree navigation for summary and affected item redline pages
- Page Filter/Selection - Provides quick links to return to summary pages
- Summary/Redline Pages - Summary of specific redline page

The Summary/Redline page area will update/change when the Affected Items/Page Navigator changes or a specific page is selected from a summary page.
|
 |
Summary Page |
Top |
|
The Summary page displays all affected items and revisions as well as provides counts for all individual data changes.

You can display the Summary page by selecting the Summary option from the Navigator tree or the Affected Item Summary from the Page Selection list.
You can launch/open the affected items by clicking on the hyperlink in the Number column.

The Summary page provides a matrix for displaying the number of changes for each data set on the affected items.

The Changes column will display the total number of changes for each affected item.

Each change count will provide a specific hyperlink to open the redline page for any affected item.

|
 |
Navigating the Redline Pages |
Top |
|
The Item Changes/Redlines form contains the following "Overview" pages:
| Affected Item Summary |
Displays all affected items and revisions as well as provide counts for all individual data changes |
| All BOM Changes |
Displays all BOM changes for all affected items. This page also provides "group edit" features for redlining BOMs on all affected items. |
| All Document Changes |
Displays Document changes for all affected items. This page also provides "group edit" features for redlining Documents on all affected items. |
| All Vendor Changes |
Displays Vendor changes for all affected items. This page also provides "group edit" features for redlining Vendors on all affected items. |
| All Attribute Changes |
Displays Attribute changes for all affected items. This page also provides "group edit" features for redlining Attributes on all affected items. |
| All General Changes |
Displays General changes for all affected items. |
| All Service Object Changes |
Displays Service Object changes for all affected items. |
You can display these pages by selecting the desired page from the Page Navigator or Page Filter/Selection list.
You can also access the "Overview" pages by clicking the specific data set column header on the Summary page.

Each page will also contain a link in the upper right section that will return you to the summary page.

In addition to the "Overview" pages, the Item Changes/Redlines form also provides a "Redline" page for the following individual data sets:
| BOM Redlines/Changes |
Allows you to view and define BOM changes for a specific affected item |
| Document Redlines/Changes |
Allows you to view and define Document changes for a specific affected item |
| Vendor Redlines/Changes |
Allows you to view and define Vendor changes for a specific affected item |
| Attribute Redlines/Changes |
Allows you to view and define Attribute changes for a specific affected item |
| General Redlines/Changes |
Allows you to view and define General field changes for a specific affected item |
| Service Redlines/Changes |
Allows you to view and define Service Object changes for a specific affected item |
You can display these pages by selecting the desired page from the Page Navigator or Summary page.
The Page Navigator will appear on the left side of the Item Changes/Redlines form.
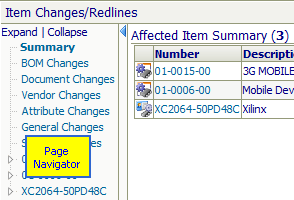
You can show and hide the Navigator by clicking the splitter bar.
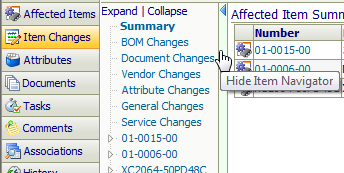
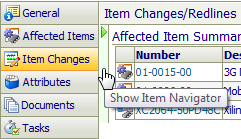
The Navigator will contain links to all "Overview" pages.
Clicking the link will display the selected page.
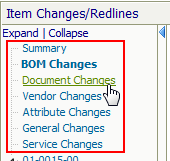
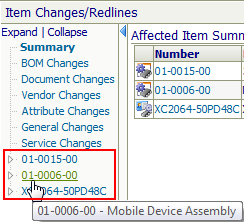
The Navigator will also list all affected items
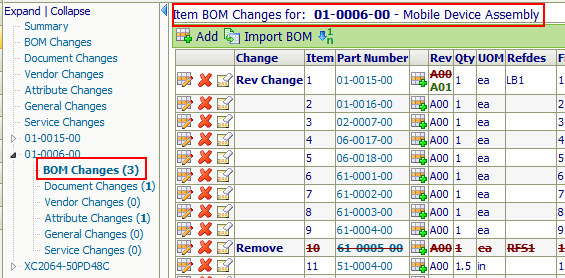
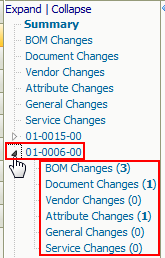
Expanding the item will display the "Redline" page links and change count for each section.
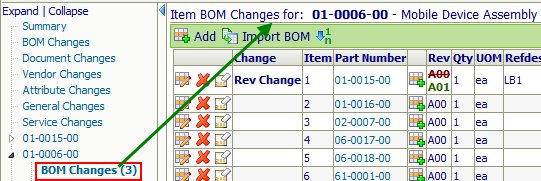
Clicking the "Redline" page link will display the selected page.
You can expand and collapse all affected items by clicking the Expand and Collapse links.
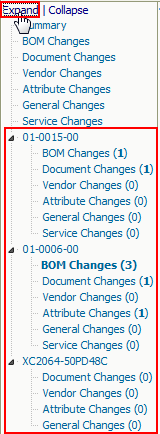
Note: Vendor Items will only contain redlines for Documents, Vendors, Attributes, and General information.

|
 |
Using the Redline Tool |
Top |
|
The Redline Tool is used to define all changes/actions to the affected items on a Change/ECO.
Selecting a specific affected item redline link from the Page Navigator or Summary page will invoke the specific redline tool.
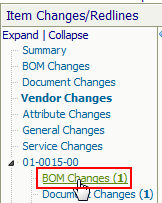

The Redline tool contains a specific data list for every type of data that can be modified on an item.
|
 |
BOM Page/Changes |
Top |
|
The Parts List/BOM Page allows you to add, modify and remove existing BOM items on affected items.

The Parts List/BOM Redline Toolbar contains the following commands:
 |
Add new BOM items |
 |
Import BOM file. BOM Import will automatically determine changes between existing BOM and BOM being imported. |
 |
Reset Item Numbers |
Each BOM item contains the following action hyperlinks (Actions column) to operate on the individual item/row:
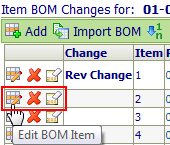
 |
Edit/Replace BOM item |
 |
Remove BOM item |
 |
Clear item changes |
|
 |
Adding BOM Items |
Top |
|
To add BOM items click the Add button.
This will display the Add BOM Item dialog box.
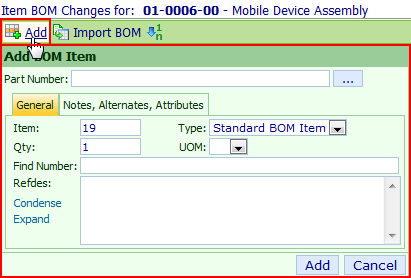
To specify the item you wish to add, you can either type the part number in the Part Number field:

Or search/browse for the item using the Browse (...) button.

Clicking the Browse button will invoke the Object Search form.
From the Search form you can search on main field keywords (part number, description, rev, status, etc.).

You can select one or more items to add. To add a single item, click the hyperlink.
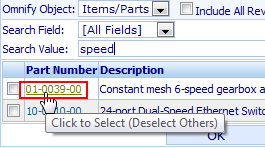
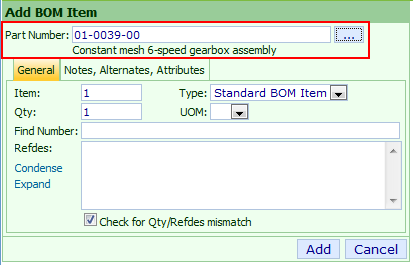
When adding only one item, the part number will be populated in the Add BOM Item dialog box.
To select multiple items, check the checkboxes of the desired items and then click the OK button.
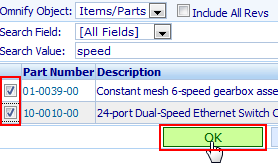
Note: when adding multiple items, the system will add the items as quantity 1 to the BOM directly without any other properties assigned.

You will then have to use the Edit operation to modify any necessary BOM item properties.
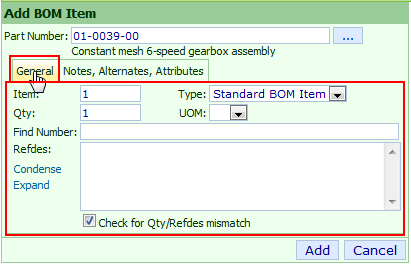
When assigning a single item, the Add BOM Item dialog box allows you to assign all BOM Item properties (Qty, Refdes, UOM, Find, attributes, etc.).
The Add BOM Item dialog box contains two tabs: General and Notes, Alternates, Attributes.

The General tab contains the following fields:
| Item |
Item/sequence number - the system will automatically assign or you can specify a numeric value |
| Type |
Select either Standard BOM Item, Reference Item, or Disabled Item |
| Qty |
Quantity (numeric or decimal values) |
| UOM |
Unit of Measure - values defined in Administrator |
| Find Number |
Find/Balloon/Drawing Reference number |
| Refdes |
Reference designators |
The Notes, Alternates, Attributes tab contains the following fields:
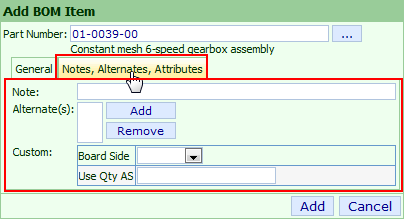
| Note |
Additional text/note field for BOM item |
| Alternate(s) |
Alternate BOM items |
| Custom |
Custom fields/attributes - define in Administrator |

The Item field represents a sequence number.
This field must be a numeric value.
The field will automatically be set by the system (next sequential number) or can be assigned.
The system will initially display the BOM sorted by the Item/Sequence field.
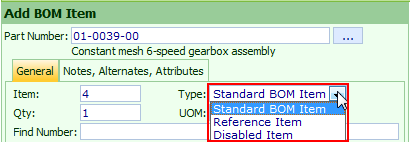
Child items of a BOM can be defined as one of the following types:
| Standard Item |
Item will be represented in all BOMs and can have multiple quantities |
| Reference Item |
Item will be represented in all BOMs and always has a Quantity of 0 |
| Disabled Item |
Item will appear in Flat View only and can optionally be exported (separate list) to reports |

The Quantity field can be either a whole number or decimal.
Fractional quantities (e.g. 1/4) will be converted to decimal values automatically.
When adding or editing items, the system can check the quantity and reference designator counts to identify a mismatch.
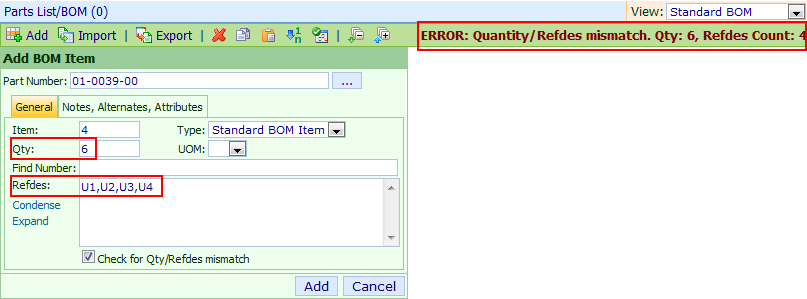
Note: changing the Quantity field to 0, will automatically change the Type to Reference Item.
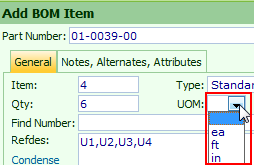
The UOM field represents the unit of measure for BOM item quantities.
UOM types are defined in the Omnify Administrator and will appear as a drop list.
UOM field can be read from an attribute assigned to the item.
Refer to the BOM Fields section for more information on using an item attribute as opposed to the BOM Item property.
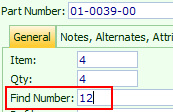
The Find Number field can represent the Find or Balloon number on a CAD drawing or any other unique identifier you wish to use.
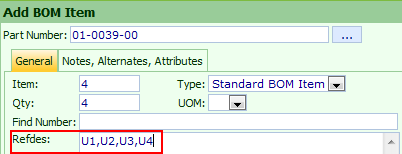
A reference designator provides a unique identifier for a component in an electrical schematic (circuit diagram) or on a printed circuit board (PCB).
The reference designator usually consists of one or two letters followed by a number, e.g. R13, C1002.
The number is sometimes followed by a letter, indicating that components are grouped or matched with each other, e.g. R17A, R17B.
Multiple reference designators can be delimited with commas (i.e. C1,C2,C3 ) or with dashes (i.e.: C1-C3 or C1-3).
The Add BOM Item dialog provides Expand and Condense functions to display the string fully expanded or by contiguous number groups.

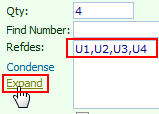
When adding or editing items, the system can check the quantity and reference designator counts to identify a mismatch.


The Note field provides an open text field for additional clarification, instructions, etc.
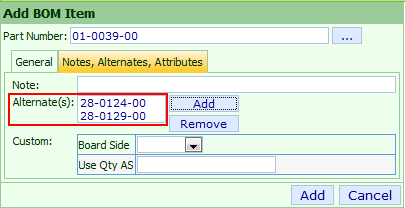
Alternate items can represent items that can replace the specified BOM item.
To add an alternate, click the Add button.

This will invoke the Object Search form.
From the Search form you can search on main field keywords (part number, description, rev, status, etc.).

You can select one or more items to add. To add a single item, click the hyperlink.

To select multiple items, check the checkboxes of the desired items and then click the OK button.

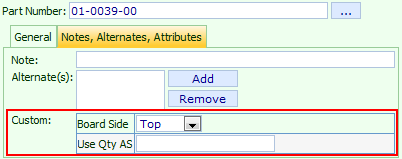
Custom BOM fields can be enabled/defined in the Omnify Administrator.
Fields can be either open text fields or pick list values.
To add the BOM Item, click the Add button.
The added items will appear in the BOM Redline window.

|
 |
Editing BOM Items |
Top |
|
You can interactively modify BOM items by clicking the Edit hyperlink of the BOM item.

This will display the Edit BOM Item dialog box.

From the Edit BOM Item dialog box, you will be able to change:
- General Page
- Item Number - Change the item number.
- Type - Change the BOM item type (Standard, Reference, Disabled item)
- Quantity - Change the quantity
- UOM - Change the Unit of Measure field
- Refdes - Adds/Changes the reference designator
- Find Number - Adds/Changes the find/balloon number
- Notes, Attributes, etc. Page
- Notes - Adds/Changes the BOM notes for the selected item(s)
- Alternate - Adds/Changes the alternate part
- Attributes - Adds/Changes the enabled BOM attributes
If the item has multiple revisions, the Rev list will be enabled.

You can also replace the item with another by specifying the new item part number in the Replace with field.

Field changes will appear in the BOM Redline form.

|
 |
Replacing BOM Items |
Top |
|
To replace a BOM item with another item, click the Edit hyperlink of the item you wish to replace.

This will display the Edit BOM Item dialog box.

You can replace the item with another by specifying the new item part number in the Replace with field.

Item replacement will appear in the BOM Redline form.

|
 |
Removing BOM Items |
Top |
|
To remove a BOM item, click the Remove hyperlink in the Actions column for the BOM item.


|
 |
Importing BOM Changes |
Top |
|
You can import BOM changes from a new BOM file directly into the Redline Tool.
To import a BOM file, use the Import BOM button from the Redline toolbar.

The BOM Import Wizard will appear.
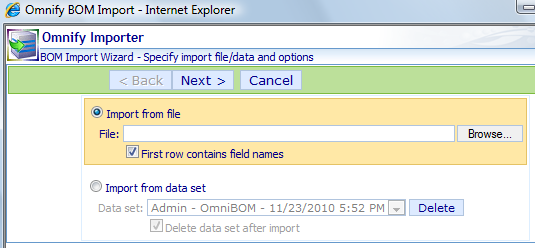
The first page of the BOM Import Wizard allows you to specify the BOM source.
You can import from either a file or "Data Set".
"Data Sets" can be created by OmniBOM, CADKit, and the BOM Import Wizard and eliminate the need to upload files.
To import a Data Set, click the Import from data set option.
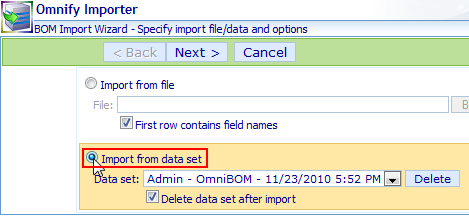
Then select a data set from the drop list.

You can delete data sources by selecting the source and then clicking the Delete button.
You will be asked to verify the removal.
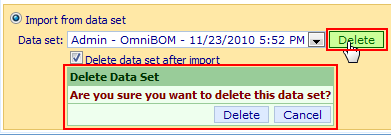
You can have the system delete the data set automatically once the import is complete by checking the Delete data set after import.

To import from a file, click the Import from file option.

You can then browse for the BOM file to import.

For Excel files, if the BOM contains the field names on the first row check the First row contains field names option.

For example, if the source looked like:

You would check the First row contains field names option.
Once the source have been identified, click the Next > button.

The Source Preview page will display the data to be imported.
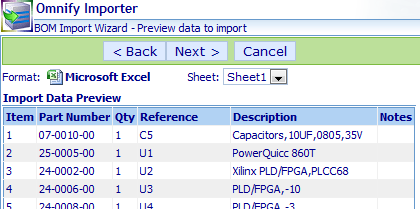
For source files that may contain multiple "sheets" (such as Excel and OmniBOM), the Sheet drop list will list all sheets.

You can select any sheet to import.
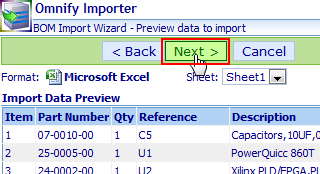
Once the correct sheet is selected, click the Next > button.
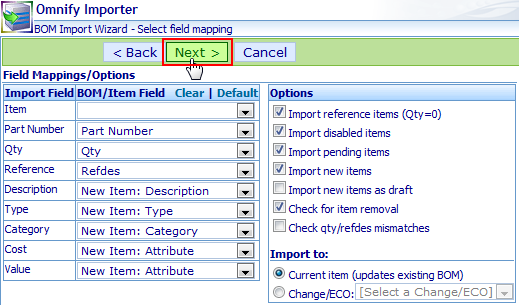
The Field Mapping and Options page will display the source fields and import options.
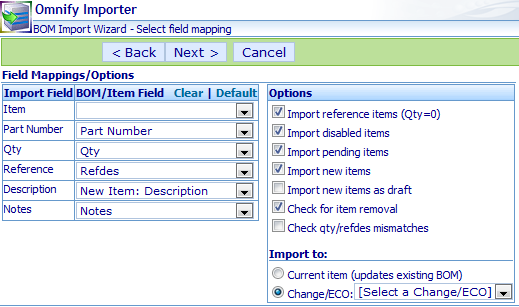
The Field Mapping list will display the fields found in the imported file.
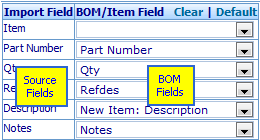
Each field will contain a drop list that will allow you to map the imported data field to a specific BOM field.
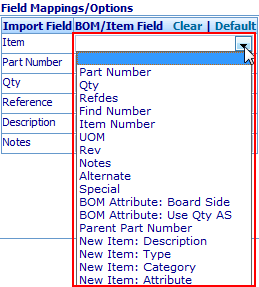
The BOM Field list will contain the following fields:
| Part Number |
Required |
Specifies the child part number column in the BOM file |
| Qty |
Optional |
Specifies the Quantity column in the BOM file |
| Refdes |
Optional |
Specifies the Reference Designator column in the BOM file |
| Find Number |
Optional |
Specifies the Find/Balloon number column in the BOM file |
| Item Number |
Optional |
Specifies the Item/Sequence Number column in the BOM file |
| UOM |
Optional |
Specifies the unit of measure column in the BOM file |
| Rev |
Optional |
Specifies the child revision column in the BOM file |
| Notes |
Optional |
Specifies the BOM item notes column in the BOM file |
| Alternate |
Optional |
Specifies the alternate parts column in the BOM file |
| Special |
Optional |
Indicates Standard, Disabled, or Reference item
Note: All items will default to Standard items, to indicate a disabled or reference item, use keywords: Disabled or Reference for this field.
Any item with a Quantity of 0 will automatically be set to a Reference item.
|
| BOM Attribute |
Optional |
Specifies a column in the BOM file that maps to one of the enabled user-defined BOM attribute fields |
| Parent Part Number |
Optional |
Specifies the Parent Part Number column when importing Hierarchical BOMs.
Note: if this field is mapped, the system will use the Hierarchical BOMs import process.
|
| New Item: Description |
Optional |
For new items (part numbers not specified or found in the database) this field will map to the new item's Description field. |
| New Item: Type |
Optional |
For new items (part numbers not specified or found in the database) this field will map to the new item's Type field. |
| New Item: Category |
Optional |
For new items (part numbers not specified or found in the database) this field will map to the new item's Category field. |
| New Item: Attribute |
Optional |
For new items (part numbers not specified or found in the database) this field will map to the new item's Attribute (specified) field. |
When importing a BOM, you will have the following options:
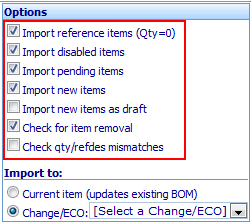
| Import reference items (Qty=0) |
Import or ignore (uncheck) Reference (Qty = 0) items |
| Import disabled items |
Import or ignore (uncheck) disabled items |
| Import pending items |
Import or ignore (uncheck) items that are not released |
| Import new items |
Import or ignore (uncheck) BOM import items that do not exist in the database |
| Import new items as draft |
When importing new items check this option for the items to be assigned a "Draft" status |
| Check for item removal |
If this option is checked, the system will remove items from the existing BOM structure that are not found in the import source |
| Check qty/refdes mismatches |
Checks for quantity and reference designator count mismatches |
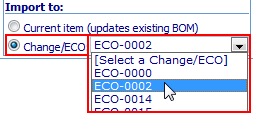
When importing from the Item form (as opposed to the Change/ECO form), you will be able to define where the changes are to be applied.

To import to the current item, select the Current item (updates existing BOM) option.

To import the BOM (and changes) to a Change/ECO form, select the Change/ECO: option and then select the target Change/ECO number.
When importing BOM file, you will have the option to import items that do not already exist in the Omnify database.
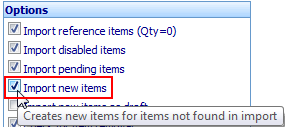
If this option is enabled, the BOM import will create parts for part numbers specified in the import file that do not already exist in the system.
The BOM import will also create items and assign part numbers for rows that are left blank in the import file.
You can identify import columns that can be mapped to item data fields to be
applied to new items that are created by the import process.
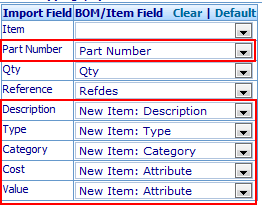
Once all fields and options have been assigned, click the Next > button.
The last page of the BOM Import Wizard will display all of the changes found between the import BOM source and the current BOM structure.
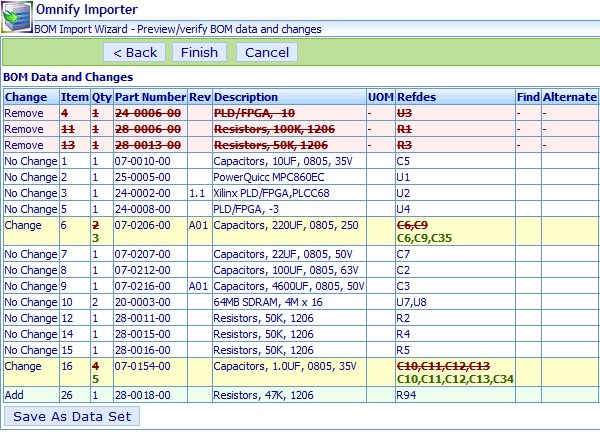
When importing a hierarchical BOM, the system will provide a filter for you to view the change for all or specific BOM/Parent items.

The final page will allow you to save the imported BOM data to a data set. To save the data to a data set, click the Save As Data Set button.
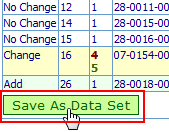
This will present the Save As Data Set dialog box where you can specify a data set name.
Click the Save button to save the data set.

Note: you can modify data sets in OmniBOM.
To import the BOM and/or Changes to the item or selected Change/ECO, click the Finish button.
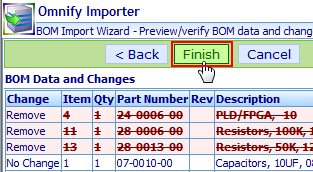
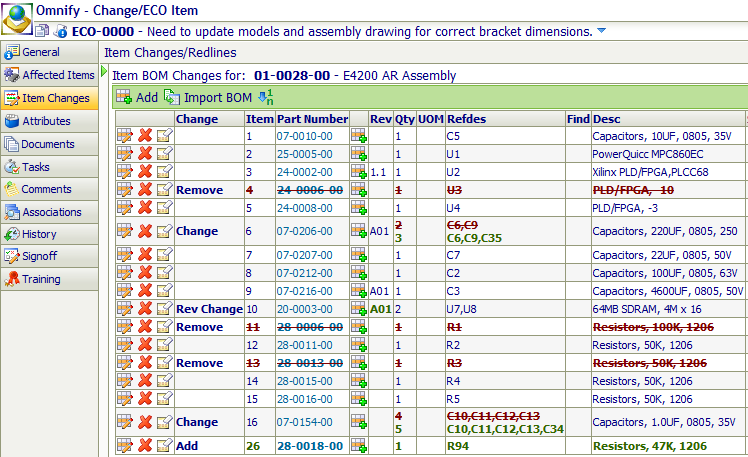
If the Import to Change/ECO option is specified, the parent items will be added as affected items and the BOM changes will automatically appear in the Redlines view for the BOM.
|
 |
Clearing BOM Changes |
Top |
|
You can clear individual BOM item changes by clicking the Clear hyperlink icon in the Actions column for any item.

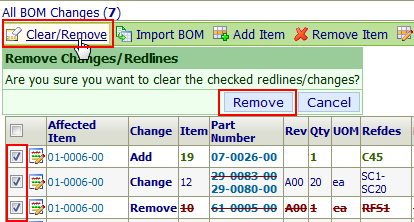
You can clear all BOM changes from the All BOM Changes page by checking the checkboxes for the changes to clear and then clicking the Clear/Remove toolbar button.
|
 |
Setting/Resetting BOM Item Numbers |
Top |
|
You can reset the item numbers for all BOM items, by clicking the Reset Item Numbers toolbar button.
This will present the Reset Item Numbers dialog box.

From the Reset Item Numbers dialog box, you can specify a starting number and then click the Update button to set the redlines.

Note: this will update the item numbers on all BOM items.
You can modify individual item numbers using the Editing BOM Items techniques described above.
|
 |
Bulk Editing of BOMs |
Top |
|
You can perform the following "group edits" to multiple BOM items:
| Add BOM Items |
Allows you to add BOM items to multiple affected items. The system will only add items that do not already exist on the specified BOMs. |
| Remove BOM Items |
Allows you to remove BOM items to multiple affected items. |
| Replace BOM Items |
Allows you to replace a BOM item with another part number on multiple affected items. The system will only replace items that already exist on the specified BOMs. |
To perform any of the group edits, you must select the All BOM Changes page using either the Page Navigator or Page Filter/Selection list.
The All BOM Changes toolbar contains buttons to perform the various group editing functions.

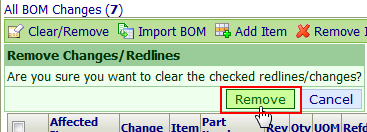
To clear multiple BOM redlines/changes first check the checkboxes in the Action column for the changes you wish to remove.
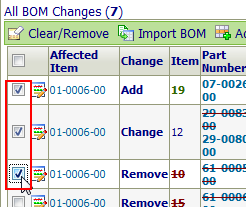
Then click the Clear/Remove button.
This will display the Remove Changes/Redlines dialog box.

Click the Remove button to clear the selected redlines.
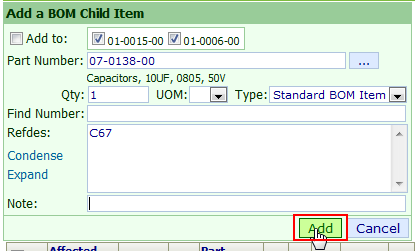
To add a BOM item to multiple affected items, click the Add Item toolbar button.
This will display the Add a BOM Child Item dialog box.

From the Add a BOM Child Item dialog box, you must first select the BOMs you wish to modify.

You can then specify the part number, quantity, UOM, Type, Find Number, Refdes, and Note fields for the item to be added.
To add the item, click the Add button.
To remove a BOM item from multiple affected items, click the Remove Item toolbar button.
This will display the Remove a BOM Child Item dialog box.

From the Remove a BOM Child Item dialog box, you must first select the BOMs you wish to modify.

You can then specify the part number for the item to be removed and click the Remove button to assign the redlines.

To replace a BOM item on multiple affected items, click the Replace Item toolbar button.
This will display the Replace a BOM Child Item dialog box.
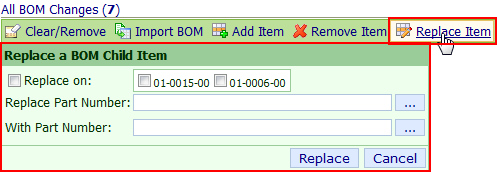
From the Replace a BOM Child Item dialog box, you must first select the BOMs you wish to modify.

You can then specify the part number for the item to be replace (Replace Part Number field) as well as the replacement part (With Part Number field) and click the Replace button to assign the redlines.

|
 |
Document Changes |
Top |
|
The Documents Redline Page allows you to add, remove, and Check-In documents on affected items.

To invoke the Document Redline tool, select the Document Changes option from the Summary page or Page Navigator.
To add a document to the list, click the Add button from the documents toolbar.
This will display the Add Document dialog box.
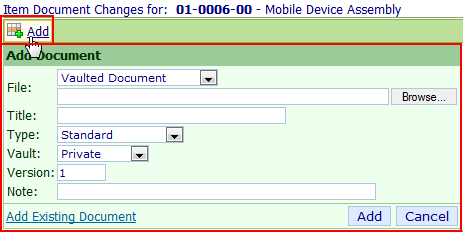
Refer to the Document Management section for more information on assigning documents.
Once all document properties are set, click the Add button to assign the document redline.
For existing vaulted documents, you will be able to check-in new versions of documents.
To check-in a new document version, click the Edit icon in the Actions column.

From the Edit Document dialog box, you can specify the new document version in the Check-in a new document version area.
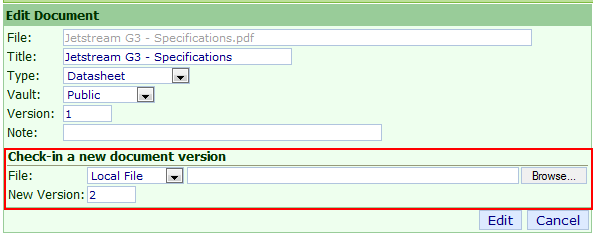
To modify the properties of any document on the list, click the document's Edit hyperlink icon.

This will display the Edit Document dialog box.

|
 |
Vendor Changes |
Top |
|
The Vendors Redline Page allows you to add and remove existing vendor parts on affected items.
To invoke the Vendors Redline tool, select the Vendor Changes option from the Summary page or Page Navigator.
To add a vendor item, click the Add button on the Vendor Redline page toolbar.
This will display the Add Vendor Item dialog box.

From the Add Vendor Item dialog box, you can either select or type the vendor name and part number or use the browse button to search for the Vendor Item.

Clicking the Browse button/icon will invoke the Object Select form and you will be able search/find the desired vendor item.

Once the Vendor and Vendor Part Number are specified, click the Add button to add the vendor item.

You can open the vendor item by clicking the Part Number hyperlink.

To remove a Vendor Item click the Clear icon hyperlink in the Actions column of the Vendor Item.


|
 |
Attribute Changes |
Top |
|
The Attribute Changes Page allows you to add, modify, and remove attributes on affected items.
To invoke the Attribute Redline tool, select the Attribute Changes option from the Summary page or Page Navigator.
To add an attribute, click the Add button from the Attribute Redline toolbar:
This will display the Add/Edit Attribute dialog box.
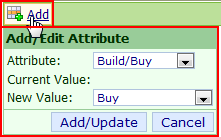
From the Add/Edit Attribute dialog box you can select the attribute and specify a value.
To add/edit the attribute, click the Add/Update button.
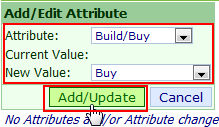
To modify the value of any attribute, click the Edit icon hyperlink.

This will display the Add/Edit dialog box and display the current value.

From the Add/Edit Attribute dialog box you can specify a different value and click the Add/Update button.


To remove any attribute, click the Clear icon hyperlink.


To clear redlines or remove any of the fields, click the Clear icon.
|
 |
General Changes |
Top |
|
The General Changes Page allows you to modify general information on affected items.
To invoke the General Information Redline tool, select the General Changes option from the Summary page or Page Navigator.
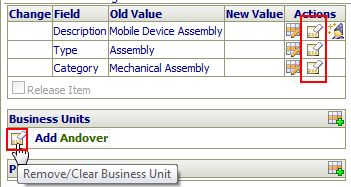
To modify any general field, click the edit icon hyperlink for the field.

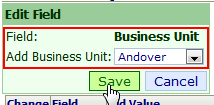
This will display the Edit Field dialog box.

Using the Edit Field dialog box you will be able to specify a new field value.


For the Description field, the system will provide a link to assign a Description using the Description Wizard.

To add Projects or Business Units, click the Add icon in the group box.

This will display the Edit Field dialog box and display a list of options to be added.
To clear redlines or remove any of the fields, click the Clear icon.
|
 |
Service Object Changes |
Top |
|
The Service Object Changes Page allows you to add, remove, and modify service object associations for any affected items.
To invoke the Service Object Redline tool, select the Service Changes option from the Summary page or Page Navigator.
To add a service object, click the Add button from the Service Object Redline toolbar.
This will display the Add Service Object dialog box.

From the Add Service Object dialog box, you can either select and type the object type and number or use the browse button to search for the Service Object.

Clicking the Browse button/icon will invoke the Object Select form and you will be able search/find the desired Service Object.
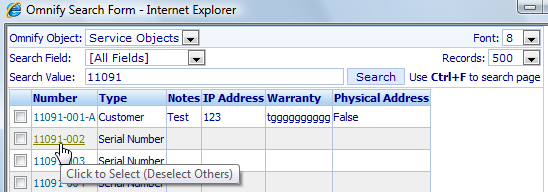
Once the type and number are specified, click the Add button to add the Service Object.

You can open the vendor item by clicking the Label hyperlink.

To remove any service object or clear any redlines, click the Clear icon hyperlink (Actions column).

|
|