Omnify Empower is a product content and lifecycle management system.
It provides a comprehensive database to:
| • | View and manage information on any database item (electrical/mechanical parts, components, documents, wire harness, assembly, etc.) |
| | » Revisions |
| | » Attributes/Parameters |
| | » Costs, Lead Times, Availability, CAD Data |
| | » Documents (linked and/or vaulted) |
| | » Supplier/Manufacturer Information |
| | » Where Used |
| • | View, manage, and compare bill of materials (BOM) and variances |
| • | Manage and control documents (version control) |
| • | Track all changes and viewing history (complete audit trail) |
| • | Initiate formal new part/item requests with electronic signoff and workflows |
| • | Initiate, track, and execute formal changes (ECR, ECO, ECN, Deviations, etc.) |
| • | Initiate, track, and provide closure for product issues and defects (Closed-loop Corrective/Preventive Action system) |
| • | Capture, track, and report supplier and customer issues (SCARs, NCMRs, Customer Complaints, etc.) |
| • | Manage and track Projects (tasks, actions, resources, timelines, deliverables, etc.) |
| • | Single and secure database to provide any user (based on user permissions) with access to all product information |
| • | Provide product data directly to design tools/environments (i.e. schematic capture/library management and mechanical design systems) |
| • | Deliver dynamic data via web to remote users |
Omnify Desktop is the main component in the Omnify Tool Suite. It provides access to many of the common tasks performed on the Omnify database such as:
| • | Search/browse for items (parts, BOMs, Changes/ECOs, CAPA Objects, Projects, Documents, etc.) |
| • | Create/request new parts and manage all part data |
| • | BOM and Document Management |
| • | Manage formal changes (ECOs, ECRs, etc.) |
| • | Manage Quality/CAPA forms |
| • | Project Management |
| • | Manage Vendors and Vendor Part Information |
| • | Import and exporting/reporting operations |
|
The system can be configured to accept either your network login and password (using LDAP) or passwords that are controlled by the Omnify administrator.
Your administrator will provide you with your login credentials.
Password Policies (such as password expiration, complexity, and account lockout) can be enforced in the Omnify Administrator.
When logging on for the first time, you may be asked to change your password (if password expiration is enabled).
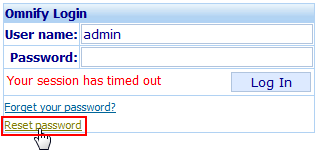
To change your password, click the Reset Password hyperlink from the Login form.

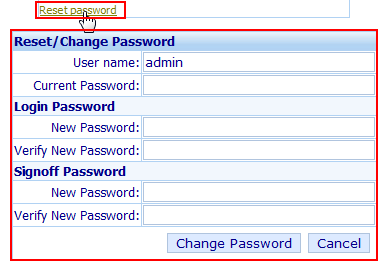
This will present the Reset/Change Password dialog.

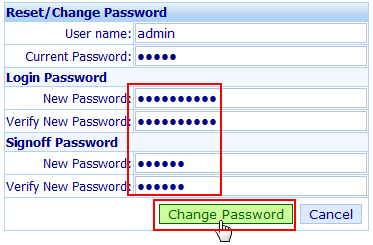
From the Reset/Change Password dialog, you will need to specify your current user name and password and then identify new passwords for login and signoff.

Click the Change Password button to set the new passwords.
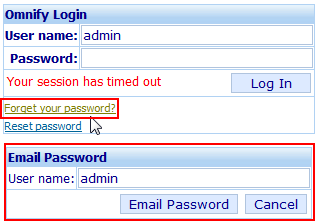
If you cannot remember your password, click the Forget your password? hyperlink.
This will display the Email Password dialog box.

From the Email Password dialog, specify your user name and click the Email Password button.

The system will look up the user's email address and send an email with the login password.
|