|
|
| Overview |
When creating Items, Changes/ECOs, Quality (CAPA) Objects, and Projects the objects will be placed in an "unreleased" state until the defined signoff users have approved the object.
Once all (required) users have approved the object, the object will be placed in an "Awaiting Release" state.
Users with appropriate permissions can place an object in an Awaiting Release state to a "Release" state using the Release (or Complete) function.

You can launch the New Object Wizard from the Common Links section of the Object Viewer.
Clicking the link will launch the New Object Wizard.

The New Object Wizard form will appear and the user will have to select the specific object from the drop list.
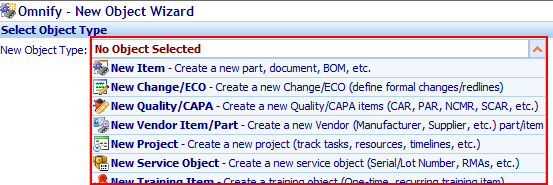
The New Object Wizard contains 2 main areas:

The Object Selection area is where the user will select the object type.

Once the object type has been selected, the Object Fields/Values area will update to display the available fields for the selected object.

Once all fields have been set, click the Create button to initiate the creation process.

Note: You can also use the New Like (File menu or Search toolbar) to create a new object by copying an existing object.
For all objects under signoff/pending, the Navigator bar will display the Signoff tab.
|
|
|
For all objects under signoff/pending, the form Banner will indicate the signoff status and display the current signoff stage.

The Signoff page will list the signoff stages and users who are reviewing or must sign off on the object before it is released.

Signoff users are defined as:
- Must Sign - The user must "Approve" the item before it can be released.
- Review Only - User can "Acknowledge" (Add comment) the item and can be included
on the Email notices, however, the user is not required to "Approve" the item before it can be released.
Signoff users can also contain a Signatory.
Default Signatory users are defined in the Administrator.
You can also dynamically assign a Signatory to any user on a specific workflow/signoff.
Signatories are users who can sign off on behalf of other users.
|
|
|
Item, Change/ECO, Project, and CAPA object signoffs are managed/controlled through signoff workflows.
Signoff workflows are comprised of a set of signoff "stages".
 |
When objects are requested, the system can automatically assign (or the user can interactively create) a signoff workflow.
Automatic workflow assignment can be based on a number of "conditions".
Refer to the Workflow Mappings section for more information on conditional workflow assignments.
Workflows can contain one or more workflow stages.
A Signoff stage can contain one or more users who are required to sign or review.
During each signoff stage, user approvals or rejections can be processed in parallel.
Once all required users (signers) approve the request, the next stage will be activated.
Each signoff stage of the workflow can contain a "Reject Stage".
If one person on an active stage rejects the object, the system can re-activate the "Reject" stage.
All previous signatures will be cleared.
Once all required users and stages have been approved, the object will then be available for "release".
|
Each signoff stage can contain an unlimited number of users.
Users can be defined as:
- Required - User must approve or reject the request
- Reviewer - User does not need to approve or reject the request, but will receive email notices, etc.
Workflows are defined in the Omnify Administrator.
|
 |
Workflow Maps |
Top |
|
Workflow Maps are used to automatically assign workflows to objects when they are requested.
Workflow Maps consist of workflow and user information as well as object "conditions".
The system will use these "conditions" when trying to determine the appropriate workflow and users when new objects are created.
Signoff stage users can be assigned at a "Workflow" level or at a "Workflow Mapping" level.
Users assigned at a "Workflow" level will represent default users for that stage.
You can modify the user list when you define a "Workflow Mapping".
Assigning users at the "Workflow Mapping" level allows you to create "generic" workflows that consist of blank/empty signoff stages,
and then define the users that should be applied to the workflow stages based on "conditions" (field values assigned to Item and Change forms).
Refer to the Workflow Maps section of the Administrator User's Guide for more information on Workflow Maps.
|
 |
Signoff Page |
Top |
|
For all objects under signoff/pending, the form Banner will indicate the signoff status and display the current signoff stage.

The Signoff page will list the signoff stages and users who are reviewing or must sign off on the object before it is released.

The Signoff Page contains the following sections:

| Workflow View Filter |
Allows you to select from multiple workflows associated with the item |
| Toolbar |
Quick access to common Signoff functions |
| Workflow Name |
Indicates the name of the assigned workflow |
| Signoff Stages and User Lists |
List of stages and users reviewing or signing the item |
| Rejection Stages |
Indicates the rejection stage |
The signoff follows a workflow (defined in the Administrator).
Signoff workflows are comprised of a set of signoff "stages".
A Signoff stage can contain one or more users who are required to sign or review.
During each signoff stage, user approvals or rejections can be processed in parallel.
Once all required users (signers) approve the request, the next stage will be
activated. Each signoff stage can contain an unlimited number of users.
The Signoff Toolbar contains the following commands:
 |
Add users, stages, workflows |
 |
Remove checked users |
 |
Send email to list users |
The signoff page will display all stages and users who are required to sign or review the object.

Active stages will be displayed with a different color in the header bar.
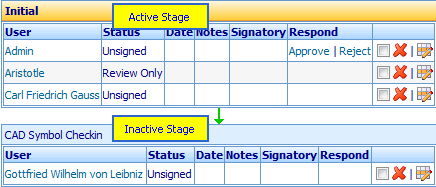
Signoff stages with "Reject To" stages will also indentify their reject stage on the Signoff Page.

If you are active for signoff, the Approve and Reject hyperlinks will be available in the Respond column.

|
 |
Automatic Workflow |
Top |
|
When new objects are created/requested, the system can automatically assign (or the user can interactively create) a signoff workflow.
Automatic workflow assignment can be based on a number of "conditions" (field values assigned to the object) defined as a "Workflow Map" in the Administrator.
You can also assign workflows interactively by selecting a predefined workflow, signoff stages, or simply adding users to the signoff.
For automatic workflow assignment, you must define a "Workflow" and "Workflow Map" in the Administrator.
When defining a "Workflow Map" for objects you can define conditions for the following fields:
- Type
- Category (Items)
- Attribute Name and Value
- Project
- Business Unit
When the user attempts to save the object for the first time, the system will
read the assigned field values and search for the appropriate workflow to
automatically assign to the new object.
|
 |
Assigning Workflows and Users |
Top |
|
To assign a workflow to any object, select the Signoff page on the Navigation Bar.

Clicking the Add toolbar button will display the Add to Workflow dialog box.
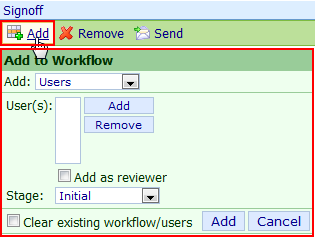
From the Add to Workflow dialog you will be able to select what type of object you wish to add.

A Workflow Map is created by the Omnify Administrator and consists of stages and users as well as object mapping properties.
The system uses the object mapping properties to determine which workflow should be applied to an object when automatically assigning a workflow.
Automatic workflow assignment will occur when a user creates a new (non-draft) object using the New Object wizard.
Workflow maps can also be assigned interactively.
To assign a workflow map, select the Workflow Map option from the Add drop list.

The dialog box will present the user with a list of Workflow Maps.
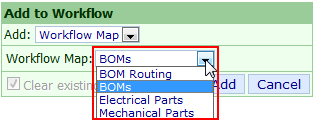
When assigning a workflow map, the system will automatically clear the current workflow and users.

To assign the workflow map, click the Add button.

A Workflow is created by the Omnify Administrator and consists of stages and users.
Users assigned to the stages can be either required to sign off or "reviewers".
To assign a workflow, select the Workflow option from the Add drop list.

The dialog box will present the user with a list of Workflows.
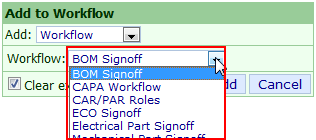
When assigning a workflow, you will have the option to clear the current workflow or append the stages of the workflow to the current workflow.
Checking the Clear existing workflow/users option will clear the current workflow and assign the new one.
Unchecking the Clear existing workflow/users option will append the workflow stages to the existing workflow.

To assign the workflow, click the Add button.

A Workflow Stage is created by the Omnify Administrator and consists of a list of users.
Users assigned to the stages can be either required to sign off or "reviewers".
To add/assign a stage, select the Stage option from the Add drop list.
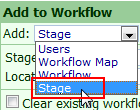
The dialog box will present the user with a list of Stages.
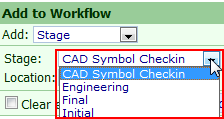
When adding a stage, you will be able to identify the position of the stage in the current workflow.
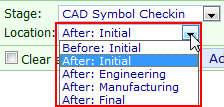
When assigning a stage, you will have the option to clear the current workflow or append the stage to the current workflow.
Checking the Clear existing workflow/users option will clear the current workflow and assign the new stage.
Unchecking the Clear existing workflow/users option will add the stage to the existing workflow.

To assign the stage, click the Add button.

To add users to a stage, select the Users option from the Add drop list.

The dialog box will present the user with a list to select users.

To select users to add to a stage, click the Add button.

This will present the Omnify Object Search form.
You can select a user by clicking the user name hyperlink, or multiple users by checking the checkbox and then clicking the OK button.
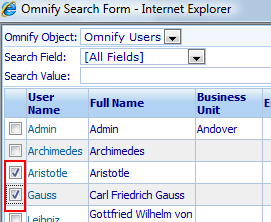

The selected/checked users will appear in the Users list.

When adding users you can assign them as either required (for signoff) or reviewer.
To assign the users as reviewer, check the Add as Reviewer option.

When adding users you can select which stage the users will appear in by specifying the stage in the Stage drop list.

When adding users, you will have the option to clear the current workflow or append the users to the current workflow.
Checking the Clear existing workflow/users option will clear the current workflow and assign the new stage.
Unchecking the Clear existing workflow/users option will add the stage to the existing workflow.

To assign the users, click the Add button.

To remove a user from the workflow, click the Remove icon in the Actions column for the user you wish to remove.

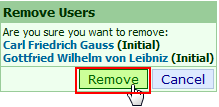
You will be asked to validate the removal.

You can remove multiple users by checking the checkbox in the Actions column and clicking the Remove toolbar button.
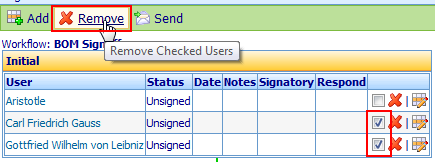
You will be asked to validate the removal.
You can change a user from required to reviewer (and vice-versa) and assign a signatory by clicking the Modify User icon in the Actions column.

The Modify User dialog will display the user options.

To assign the user as a "Reviewer", uncheck the Required for signoff option.
To assign the user as "Required", check the Required for signoff option.

To assign a signatory, you can either type the user's name or use the ... (browse) button to search/find a user.

Once the desired settings are applied, click the Modify User button to update the workflow user.

|
 |
User Signoff |
Top |
|
To sign off on any object, select the Signoff tab from any object form.

If you are active for signoff, the Response column will contain hyperlinks for approving or rejecting the object.

To approve or reject, click the appropriate hyperlink.

You will be asked to validate your response. You can also add a signoff comment.

If approval passwords are required (Omnify Administrator), the user will be asked to provide the signoff password.

Click the Approve or Reject button to validate your response.
Your signoff status will be displayed on the workflow.

When rejecting an object, the system will reset the signoff to the associated Reject stage (defined in the Workflow).

If a reject stage is not defined, the user will be able to select the stage to Reject the signoff to (if the reject option is enabled in the Administrator).

|
 |
Sign on Behalf |
Top |
|
Signoff users can also contain a Signatory.
Signatories are users who can sign off on behalf of other users.
Default Signatory users are defined in the Administrator.
Signatory users can be assigned dynamically on a signoff list from the Modify User dialog box.

To assign a signatory, you can either type the user's name or use the ... (browse) button to search/find a user.

The Signoff Page will display the authorized signatory for each user.
If you are an authorized signatory, the Sign On Behalf hyperlink will be enabled.

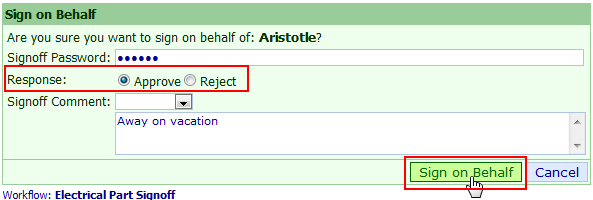
Clicking the Sign On Behalf hyperlink will invoke the Sign on Behalf dialog box.
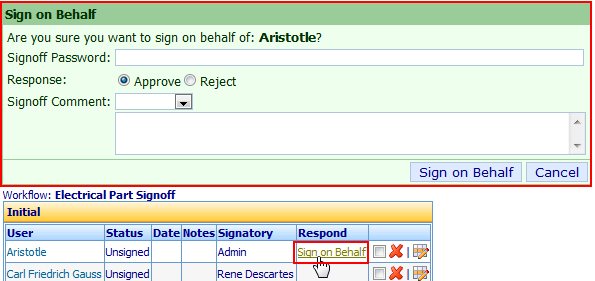
The Sign on Behalf dialog box allows you to add a signoff comment.
If the Administrator has enabled the signoff password requirement option,
the user will be forced to provide their signoff user name and password.
To approve (or reject) the object, click the Approve or (Reject) option and then click the Sign On Behalf button.
|
 |
Email Notices |
Top |
|
You can enable automatic email messages to be sent to users when they become active for signoff on any object.
Automatic email messages are enabled in the Administrator.
You can interactively send email messages from the signoff page, by clicking the Send toolbar button.
This will display the Email Workflow Users dialog box.
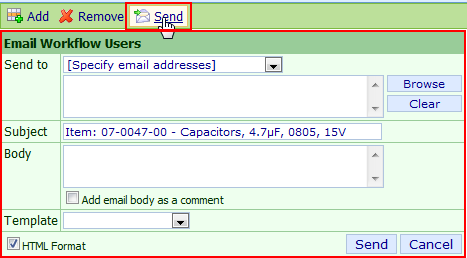
From the Email Workflow Users dialog box, the Send To drop list provides the following options.

| All users on signoff list |
Assigns emails for all users on the list |
| Active users on signoff list |
Assigns emails for only the active users on the list |
| Users who have not signed off |
Assigns emails for only those who have not set signed |
| Users who are required to sign off |
Assigns emails for all required users |
| Users who are reviewing |
Assigns emails for all reviewers |
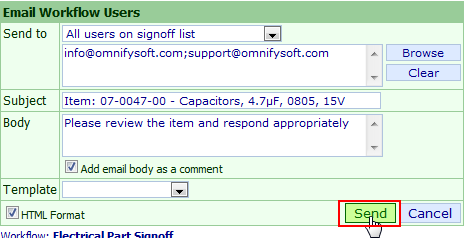
Selecting an option from the Send To list will update the Send list with the email addresses of the users selected.


You can browse for specific Omnify users using the Browse button.

Multiple email addresses in the Send box must be delimited with semicolons.

The Subject and Body fields allow you to define the content of the email.

Checking the Add email body as a comment option will add a comment with the content from the Body field to the object.

An email template can be used to define the content of the email.

To send the email, click the Send button.
|
|
|
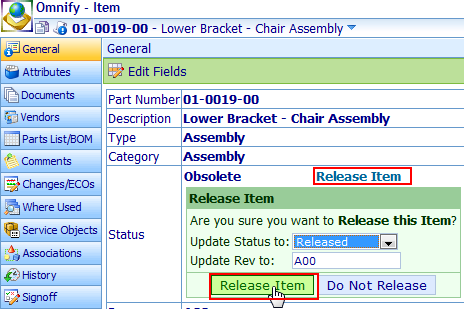
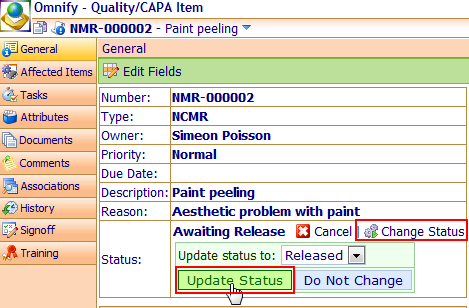
Once all users who are required to sign an object have approved, the object will enter an "Awaiting Release" state.
The "Release" option or Status update options will appear on the General page.
Note: Each form will differ.
| Change/ECO |
 |
| Item |
 |
| Quality/CAPA |
 |
|
|