| Overview |
The Users page of the training form will list all users/resources required to receive the training.
The Users list will display the Status, Due Date, and Completion Date for all users assigned to the training object.

Depending on the logged user, the Actions columns will contain hyperlinks and/or checkboxes for various editing functions.

The Users list will automatically group users based on the revision of the training item they were assigned.
You can view the current, selected, and all revision of the training item by changing the Revision filter on the Users list.

Refer to the Revisions section for more information on Training Revisions.
|
 |
Adding Users |
Top |
|
To add users, click the Add User(s) toolbar button.

This will invoke the Object Search form.

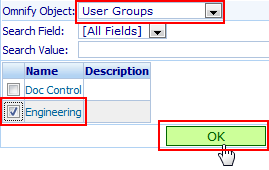
From the Object Search form you can change the Object drop list to add:

| User |
Select one or more Omnify Users to add |
| User Group |
Select a user group. All members/users of the group will be added to the training item. |
| Business Unit |
Select a Business Unit. All members/users assigned to the Business Unit will be added to the training item. |
| Custom User Attribute(s) |
Select a Custom User Attribute and Value. All users whose attribute field matches the selected value will be added to the training item. |
To add users, User Groups, Business Units, and User Attributes, check the items using the Action checkboxes.

Then, click the OK button.

The selected users will be added to the list.

Once a User Group, Business Unit, or User Attribute is added, the system can automatically add users to the training items when the Administrator creates new users.
Refer to the Adding Users Automatically section for more information on automatic user training assignment.
|
 |
Adding Users Automatically |
Top |
|
When adding users to a Training item, you can select a User Group, Business Unit, and/or Custom User Attribute.

When adding users based on these "groupings", the Group column will display the user group assignment.


When the Omnify Administrator adds or modifies users (in the Administrator), the system will automatically add the users to the training items based on the assigned training groupings and user properties.
For example, a training item has been assigned users under the Business Unit "Andover".

An Omnify Administrator then creates a new user and assigns them to the "Andover" Business Unit.
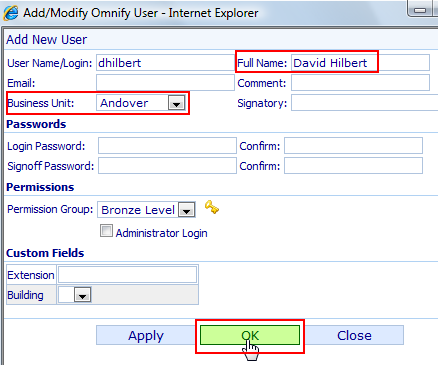
The user will be added automatically to the training items that have been assigned the "Andover" Business Unit.

The history will indicate the Administrator user addition.

|
 |
Modifying Users |
Top |
|
To modify a user, click the Edit hyperlink in the Actions column.

This will display the Edit User dialog box.
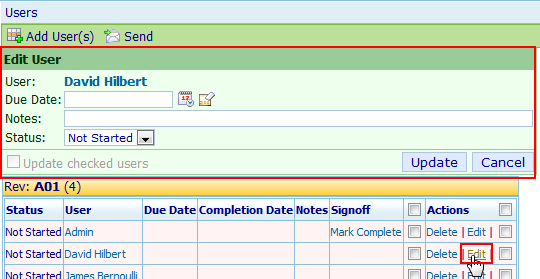
From the Edit User dialog box you will be able to set the Due Date, Note, and Status.
Once the changes are defined, click the Update button to modify the user.

|
|
|
To modify multiple users, first check the checkbox (Actions column) of the users you wish to edit.

Then click the Edit hyperlink on any of the checked users.

This will display the Edit User dialog box.
Notice the Update checked users option is enabled.

To modify the checked users, specify the changes, check the Update checked users option, and then click the Update button.

|
 |
Removing Users |
Top |
|
To remove a user, click the Delete hyperlink in the actions column.

You will be asked to verify the removal.

|
 |
User Status |
Top |
|
You can modify the user's status directly by clicking the Edit hyperlink (Actions column).

This will display the Edit User dialog box.

From the Edit User dialog box you will be able to set the Status.
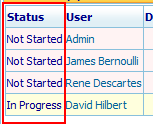
User status can be either Not Started, In Progress, or Complete.

For recurring training objects, the status will be set as Recurring and cannot be modified.

Once the status has been set, click the Update button to update the status.

The Status column will display all users' statuses.
|
 |
User Signoff |
Top |
|
When the logged user is active for a Training event, the Users page will provide them with a Mark Complete hyperlink in the Signoff column that will allow them to update their status a "Complete".

Clicking the Mark Complete hyperlink will present the user with the Mark As Complete dialog box.

If enabled, the user will have to provide their signoff password.
If Training Comprehension is required, the system will determine if the user has completed the comprehension exam.
If the user has not completed the exam, the system will not allow them to sign off.

Refer to the Comprehension section for more information on Training Comprehension.
|
 |
Trainer Signoff |
Top |
|
If the logged user is assigned as the Trainer, the user will be able to mark the users as complete.
When the assigned trainer views the Users page, a trainer signoff checkbox column and Signoff as Trainer hyperlink will appear.

As a trainer, to mark users as complete, you must first check the trainer signoff checkbox for the desired users.

Next, click the Signoff as Trainer hyperlink.

The Sign on Behalf dialog box will appear.
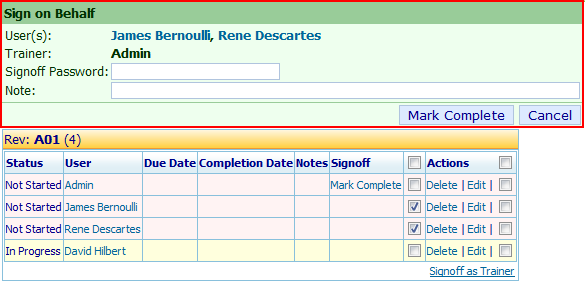
From the Sign on Behalf dialog box, you will be asked to provide you signoff password (if enabled) and then click the Mark Complete button to mark the users as complete.

|