| Overview |
The Project Management module provides the ability to capture critical project data such as project tasks, actions, and resources (users) responsible for carrying out project tasks.
The Project Management module tracks timeframes, deadline and deliverables and provides an alerting mechanism to automatically remind users when tasks are nearing (or exceeding) allotted timeframes.
The Project Management module is vertically integrated with all Omnify objects and product data.
For example, Projects can be associated with parts, BOMs, documents, Changes/ECOs, Quality Items, Training, etc.
Leveraging "automated tasks" (described in the Tasks section of this document) events that occur to associated items (such as the release or signoff of a document) can automatically update the project's status.
|
 |
Initiating/Creating Projects |
Top |
|
To create a Project, you must use the New Object Wizard.
Refer to the New Object Wizard for more information on creating objects.
|
 |
Project Types |
Top |
|
Projects can be created and classified to represent any type of project where timelines and deliverables need to be managed,
such as the entire product development process, individual product development steps (e.g. model/assembly/schematic creation), quoting, vendor/supplier auditing, etc.

Project types can determine required fields, Project Name/Number format, and workflows.
Project Types are defined in the Administrator.
|
 |
Project Form |
Top |
|
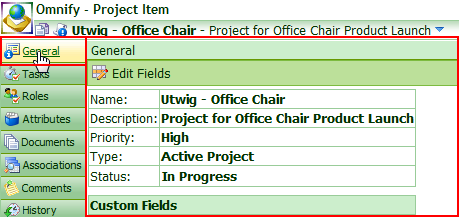
The Project form is used to display data about all Projects regardless of the type.

The Form contains three main areas:
| Banner |
Displays Name/Number, current page indicator, current status and is visible from all Data Pages |
| Data Page Navigator |
Provides quick links to all available data pages |
| Data Page Area |
Lists all data for the currently selected data page |
|
 |
Project Banner |
Top |
|
The Banner displays the following information:

| Copy Icon |
Clicking will copy the item to the system buffer (for subsequent Paste operations) |
| Name, Info, Action Menu |
Displays the current Project Name/Number and Description. Placing mouse over will invoke form Action menu. |
| Status Area |
Indicates internal state of item (Pending, Awaiting Release, etc>). Status area will be blank for released items. |
Clicking the top left icon will redirect you to the Desktop Home Page.

Clicking the Copy icon will place the item to the system buffer (for subsequent Paste operations).

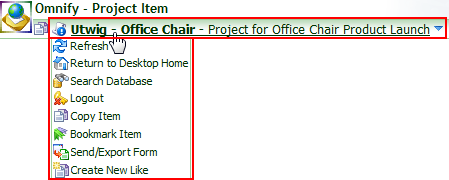
Placing mouse over the Number/Description will invoke form Action menu.
The menu will contain the following commands:

| Refresh |
Refreshes/Reloads the form |
| Return to Desktop Home |
Redirects you to the Desktop Home Page |
| Search Database |
Redirects you to the Database Search form |
| Logout |
Logs you out of Desktop |
| Copy Item |
Places the item in the system buffer |
| Bookmark Item |
Bookmarks the form |
| Create New Like |
Invokes the New Like form |
The top right section of the banner contains the following hyperlinks:

| Refresh |
Refreshes/Reloads the form |
| Home Page |
Redirects you to the Desktop Home Page |
|
 |
Data Page Navigator |
Top |
|
The Data Page Navigator allows you to quickly jump to the different data sections of the Project form.
Selecting an option from the list will update the data page pane to display that data section.


The Navigator page names can be modified using XML Dictionary files.
Contact a qualified Omnify Application Engineer for more information on creating XML Dictionary files.
|
|
|
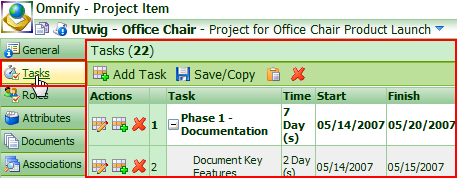
All Project forms contain the following data pages:
| General |
Name/Number, Type, Priority, Description, custom fields |
| Tasks |
Tasks assigned to resources |
| Roles |
User assignments |
| Attributes |
Use parameters to define additional information |
| Documents |
Documents assigned to the Project |
| Associations |
Associated Items, Changes, CAPA, etc. |
| Comments |
General user and signoff comments |
| History |
List of changes that have occurred to the Project (User, Date, Tool Used) |
| Signoff |
Users who are reviewing or are required to sign-off on this item |
| Training |
Associated training items |
|
 |
Completing Projects |
Top |
|
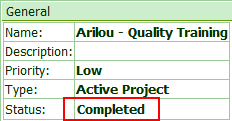
The Status field will indicate the internal status of Projects (such as: In Progress, Awaiting Completion, Completed, etc.).
While tasks are still open and there are required signoff users who have not approved the project, the project will remain in an "In Progress" state.

Once all tasks have been completed and all users have approved the project, the project will automatically enter an "Awaiting Completion" state.

You can mark the project as being complete by clicking the Mark Project As Complete hyperlink.
This will display a confirmation dialog box.

To mark the project as complete, click the Mark As Complete button.

This will mark the project as complete.
No further edits will be allowed to the project.

|