| Overview |
|
In Omnify, Vendors represent companies who supply purchased items.
Vendor Items represent the items (parts, assemblies, documents, etc.) that are supplied by other sources.
|
|
|
Vendor objects can contain the following data (note Vendor Name is required, all other data is optional):
- Name - Company name
- Type - Vendor classification (e.g. Manufacturer, Supplier, Distributor, Partner, Customer, etc.)
- Status - Status rating of company
- Address Information
- Address, City, State, Country, Zip
- Web Site - Company web site
- Comment - Notes about vendor
- Contact - Main contact
- Email - Main contact email address
- Phone - Vendor phone number
- Fax - Vendor fax number
- Custom Fields - User-defined fields

To create a vendor you must use the New Object Wizard.

From the New Object wizard, select the Vendor option.

You will then be able to define the Vendor name and Type as well as any additional default and/or required fields (defined in the Administrator).
Once all required fields have been supplied, click the Create button to create the Vendor.

You will be asked to verify the Vendor creation. Click the Create Object button to create the vendor and launch the Vendor form.


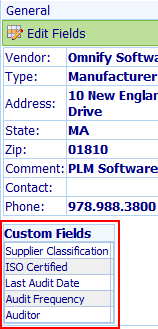
The General Page allows you to define key vendor information such as: vendor name, type, status, address information and any custom fields.
You can create custom fields for Vendors in the Omnify Administrator.
Custom fields will appear on the General page of the Vendor form.
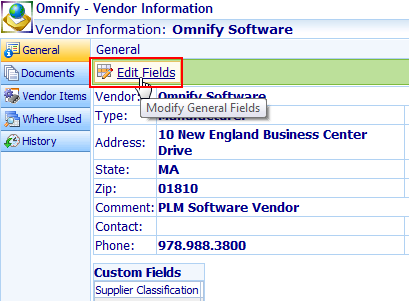
To modify any of the general fields, click the Edit toolbar button.
This will place the fields in an edit mode and allow the user to set field values.
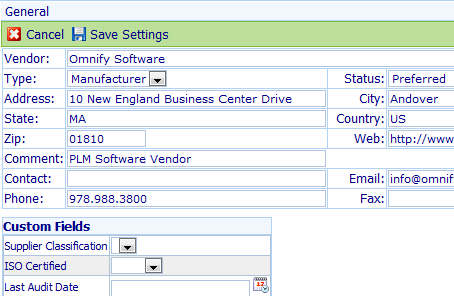
To cancel the editing mode, click the Cancel toolbar button.

To apply any field value changes, click the Save Settings toolbar button.

To assign documents to Vendor objects, select the Documents tab from the Vendor form.

Refer to the Document Management section for more information on all document functions.
The Vendor Items page will display all Vendor items/parts assigned to the vendor.

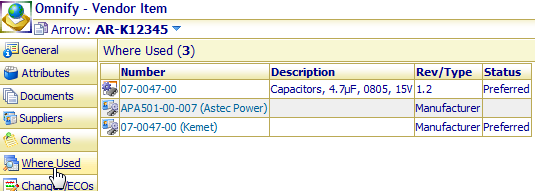
The Where Used page will display all Vendor items and the items that they are associated with.

The History page will display all change and email history for the vendor.

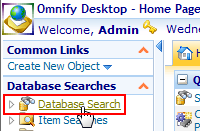
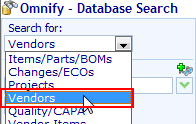
To search for vendors, open the Database Search window (Object Viewer).
Select the Vendors option from the Search for drop list.
Refer to the Searching section for more information on all searching functions.
|
 |
Vendor Items/Parts |
Top |
|
Vendor Items can be associated with:
- Omnify Items
- Other Vendor Items (Vendor Item Hierarchy)
Vendor Items are referenced based on Vendor Name and Vendor Part Number.
To create a vendor item/part you must use the New Object Wizard.
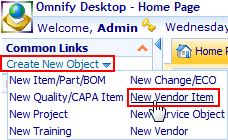
From the New Object wizard, select the New Vendor Item/Part option.

You will be required to specify the Vendor name and Part Number as well as any additional required fields (defined in the Administrator).
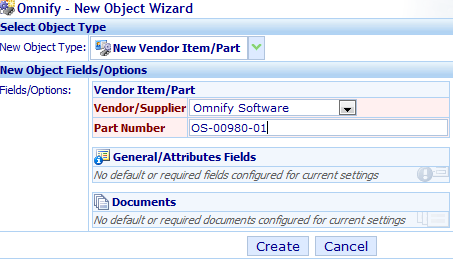
To create the vendor item, click the Create button.
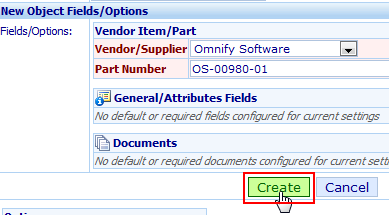
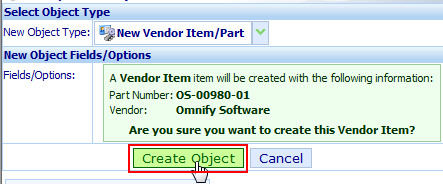
You will be asked to verify the Vendor Item creation.
Click the Create Object button to create the vendor item and launch the Vendor Item form.
|
 |
Vendor Item Hierarchy |
Top |
|
You can associate vendor items to other vendor items, thus allowing you to build manufacturer/supplier/distributor relationships.
For example, part XYZ is manufactured by "Vendor A", and sold or distributed by "Distributor A" and "Distributor B".
Both "Distributor A" and "Distributor B" have different part numbers.
To create this relationship, first create the Vendor Item for Vendor A.
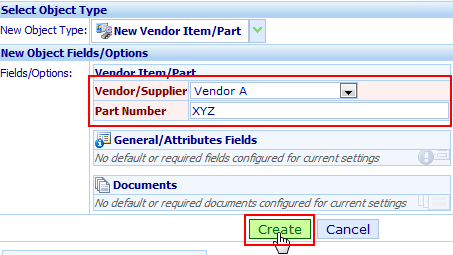
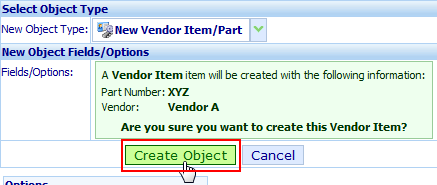
This will launch the Vendor Item form automatically.
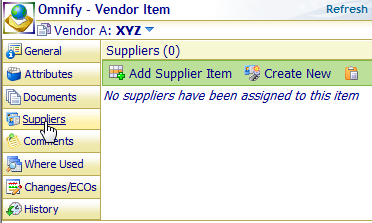
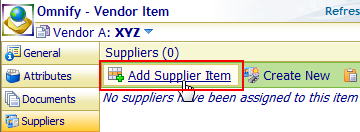
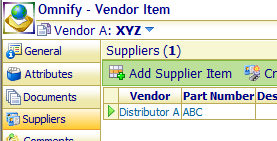
Selecting the Suppliers page will display the current suppliers/distributors for the item.
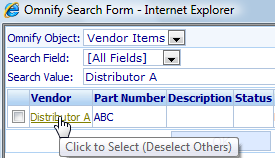
To add the distributor item references, click the Add Supplier Item to assign an existing Supplier item or Create New to create a new Supplier item.

Add or create a distributor parts.
|
 |
Vendors/Suppliers Page |
Top |
|
The Vendors/Suppliers Page is where you define the associated supplied items and is available on Item and Vendor Item forms.
It contains the following sections:
| Toolbar |
Quick access to common Vendor Item functions |
| Vendor Item List |
Current listing of associated vendor/supplier items |

The Vendors/Suppliers Toolbar contains the following commands:
 |
Add an existing vendor item |
 |
Create a new vendor item |
 |
Paste vendor items from clipboard |
Each vendor item contains action hyperlinks (Actions column)

| Delete |
Remove vendor item |
| Edit |
Edit vendor item properties |
| Up |
Move vendor item up (Promote) |
| Down |
Move vendor item down (Demote) |
The Vendor column will contain hyperlinks.
Clicking the hyperlink will open the Vendor form.

The Part Number column will contain hyperlinks.
Clicking the hyperlink will open the Vendor Item/Part form.

|
 |
Vendor Data Display |
Top |
|
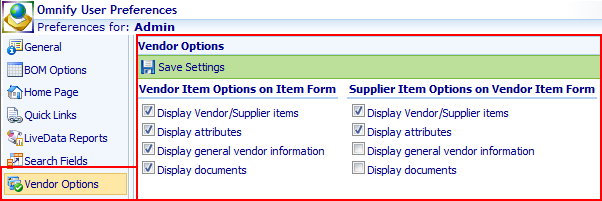
The Vendors Page allows the user to view "extended" data for every vendor part in the list.

To view specific data about a vendor part, select the Expand button.

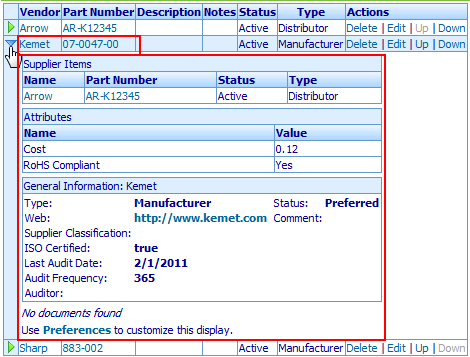
Users can select the sections of data that are visible when vendor items are expanded from the section of the User Preferences form.

The Vendor column will contain hyperlinks.
Clicking the hyperlink will open the Vendor form.

The Part Number column will contain hyperlinks.
Clicking the hyperlink will open the Vendor Item/Part form.

|
 |
Adding/Editing Vendor Items |
Top |
|
To add a vendor item, click the Add Vendor Item button on the Vendor page toolbar.

Note: You can only add vendor items that have already been created with the New Object Wizard.
If the Vendor Item you wish to add has not been created yet, use the Create New toolbar button.

Clicking the Add Vendor Item will invoke the Object Search form.
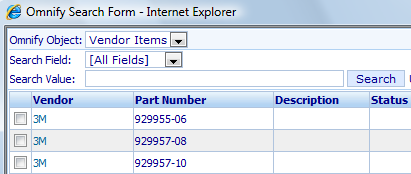
Using the Object Search form you will be able to search on key Vendor item fields (such as: Vendor Name, Part Number, Description, etc.)

Once you find the desired item, click the hyperlink to add it to the list.


To edit the properties of the vendor item, click the Edit hyperlink.

The Edit Vendor Item dialog box will appear.
From the dialog box you can modify the Notes field.
Once all changes are made, click the Update button to update the notes.

Note: To modify the Vendor Item itself (Attributes, Documents, Suppliers, etc.) open the vendor item in its own form (click the Part Number hyperlink or Open hyperlink).

|
 |
Removing Vendor Items |
Top |
|
To remove a vendor item, click the Delete hyperlink.

You will be asked to verify the removal.

|
 |
Vendor Item Properties |
Top |
|
Vendor priorities are defined by the order each item appears in the list.
Use the Up (Promote) and Down (Demote) links to define the priority.


When exporting a BOM you will be able to define how many vendor items (based on priority) you wish to appear in the output.
|
 |
Vendor Item Form |
Top |
|
Selecting the Part Number from the Vendors page (or running from a Vendor Items database search) will open the Vendor Item/Part in the Vendor Item Form.
The Vendor Item Form contains the following main areas:
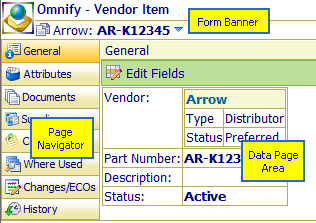
| Form Banner |
Displays Vendor name and Part Number and is visible from all Data Pages |
| Data Page Navigator |
Provides quick links to all available data pages |
| Data Page Area |
Lists all data for the currently selected data page |
The Vendor Item Form contains the following pages:
Vendor Items can be modified from either the Vendor Item form (depending on user Permissions) or under Change/ECO.
Refer to the Change Management section for more information on modifying vendor items under Changes/ECOs.
|
 |
Vendor Item Form - General Page |
Top |
|
The General Page of the Vendor Item form allows you to set:
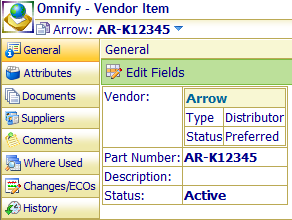
| • | Part Number - Vendor Part Number |
| • | Description |
| • | Status - Options defined in the Administrator |
To modify any of the general fields, click the Edit Fields toolbar button.

This will place the fields in an edit mode and allow the user to set field values.
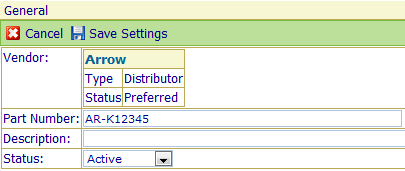
To cancel the editing mode, click the Cancel toolbar button.

To apply any field value changes, click the Save Settings toolbar button.

|
 |
Vendor Item Form - Attributes Page |
Top |
|
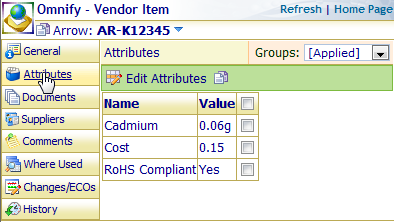
You can assign unlimited attributes/parameters to any vendor item.
Attributes have both an Attribute Name and Value.
Attributes can represent any associated data that you need to define for an item.
The Attributes Page contains the following sections:

| Toolbar |
Quick access to common attribute functions |
| Attribute List |
Current attribute names and values (based on selected attribute group/filter) |
| Attribute Group Filter |
Attribute groups list that allows you to display only certain attributes |
Attribute fields are defined in the Omnify Administrator.
Attribute fields can have the following type:
- Text - Any characters can be used in the value
- Numeric - Values can only contain numeric values
- Date/Time - Values can only be in Date/Time format
Attribute Values types can be:
- User Edit - User can pick from an existing or type in a new value
- Pick List - User can only select from a list of values defined in the Administrator.
- Multiple Value - User can select multiple values from a list defined in the Administrator.
User Edit fields can appear as single text line or multiple text lines.

To modify the attributes, click the Edit Attributes toolbar button.

This will place the fields in an edit mode and allow the user to set field values.

To cancel the editing mode, click the Cancel toolbar button.

To apply any field value changes, click the Save Settings toolbar button.

Depending on the value type, you will be able to select a value from a drop list (pick list), type a value (user edit), or select from a list (multiple values).

Each field will provide a Select Value icon that will allow you to select values from the database.

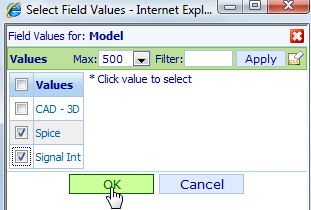
To clear/remove attribute values, click the Clear/Remove Value icon.


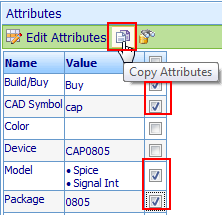
You can copy the attributes from one item to another using the Copy and Paste commands on the toolbar or menus.
To copy an individual field, check the field checkbox next to the attribute field.
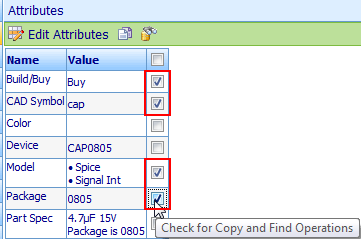
To copy the checked attribute fields, click the Copy command on the Attributes toolbar.
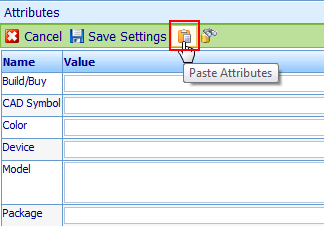
To paste attribute values, click the Paste command on the Attributes toolbar.
Note the paste command will only appear when you are in Edit mode.

Attributes can be grouped into user-defined collections.
These "collections" can then provide different attribute views on the Attributes page of the Item Master form in Desktop.

Attribute Groups are defined in the Administrator.
Selecting a group will modify the Attribute list to display only the attributes defined for that group.

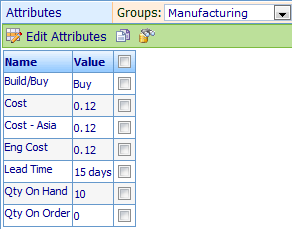
The Attributes list will contain 3 default attribute filters:
- <Applied> - Lists only those attributes that have values
- <All> - Lists all attributes (assigned and unassigned)
- <Required Attributes> - Displays the Required Attributes (assigned in the Administrator)

|
 |
Vendor Item Form - Documents Page |
Top |
|

Omnify supports unlimited document/attachment assignments for any vendor item.
Documents are specified by their path and file name, and can optionally contain a Title and Type to help describe the document.
Documents associated with vendor items in the Omnify database, can be either vaulted or non-vaulted documents.
- Vaulted Documents - Document information is managed in and by the Omnify database.
Vaulted documents require "Check-out" and "Check-in" functions to make modifications to the document.
- Non-vaulted Documents - Document items are links to existing files (typically in a shared file area/directory)
The Documents Page contains the following sections:
| Toolbar |
Quick access to common Document functions |
| Document List |
Current listing of associated documents |
| Document Navigator |
Quick filter for displaying specific documents in the document list |

Refer to the Document Management section for more information on managing documents.
|
 |
Vendor Item Form - Suppliers Page |
Top |
|

The Suppliers page allows you to define supplier reference items.
Assigning supplier items allows you to define vendor item hierarchy.
Refer to the Vendor Item Hierarchy section for more information.
|
 |
Vendor Item Form - Comments Page |
Top |
|
The Comments page contains all user comments and notes.
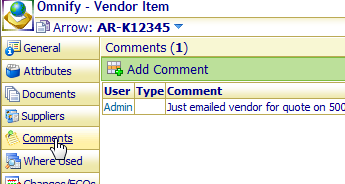
To add a comment, click the Add Comment toolbar button.
The Add Comment dialog box will appear.

From the Add Comment dialog box you can select a comment type and define the comment text.

Click the Add button to add the comment.
Your Omnify administrator can enable rules to allow users to edit and remove their own comments.
If the rules are enabled, an Edit link will be enabled in the Actions column.

Clicking the Edit link will display the Edit Comment dialog box.

To edit the comment, modify the text and/or type and click the Update button.
Your Omnify administrator can enable rules to allow users to edit and remove their own comments.
If the rules are enabled, a Delete link will be enabled in the Actions column.

Clicking the Delete link will ask you to verify the removal.

|
 |
Vendor Item Form - Where Used Page |
Top |
|
The Where Used page allows you to view which items reference the vendor item.
|
 |
Vendor Item Form - Changes/ECOs Page |
Top |
|
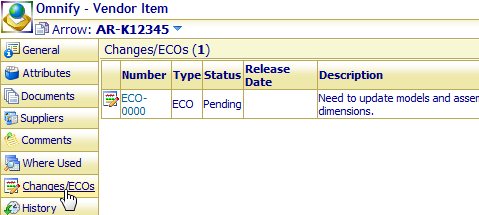
The Changes/ECOs page allows you to view which Changes/ECOs have included the Vendor Item as an affected item.
Refer to the Change Management section for more information on modifying vendor items under Changes/ECOs.
|
 |
Vendor Item Form - History Page |
Top |
|
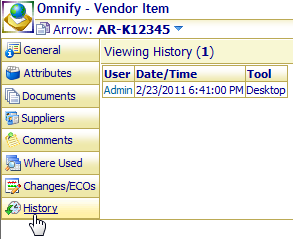
The History Page lists all change, viewing, and email history (audit trail) for every item.
Any change that occurs (interactive changes, data uploads, ECO changes, etc.) is recorded for every item in the database.
Desktop will automatically fill in the change and viewing history information for this page.
The History list will display all changes to the item as well as the viewing (who has opened the item) and email history.
To change the view, select the Viewing History, Change History or Email History option from the Display drop list.

The Change History list contains the following information:
- Change - Type of Change (Attributes, BOM, Vendor Items, Documents, etc.)
- Details - Actual data changes
- User - User who made the change (or released the ECO)
- Date/Time - When the change was made
- Tool Used - Omnify module used to make the change (i.e. Desktop, ECO Processor, etc.)
The Viewing History list contains the following information:
- User - User who opened the item
- Date - When the item was viewed
- Tool Used - Tool/module used to view the item
- Workstation - Machine/system used to view the item
The Email History list contains the following information:
- Send Date/Time - Date and time the email was sent
- Subject - Subject line of the email
- User - User who sent the email
- Type - Either interactive or automatic
The Email list will contain a Details icon.
Clicking the icon will display the content of the email.


|