| Overview |
A Tasks page is available for:
- Projects
- Changes/ECOs
- Quality (CAPA) Forms
- Training Objects
Tasks are used to define actions that users are responsible for completing on any given object.
Tasks can contain timeframes that define the start and end date and times allotted for a task's completion.
|
|
|
The Tasks page lists all tasks and associated data.

When adding and positioning tasks you can arrange any hierarchical representation of the tasks.

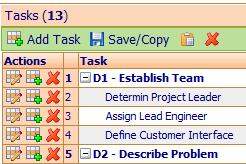
Hierarchical Tasks can be expanded or compressed using the Expand and Compress indicators before the task name.
|
 |
Task Terminology |
Top |
|
Tasks can be either Summary Tasks or Action Tasks.
Summary tasks are tasks that contain child tasks (parent items).

Summary tasks will contain Expand and Compress indicators before the task name.
For Summary tasks, the "Time" (Duration), "Start", "Finish", and "% Complete" fields cannot be modified by the user.
These fields will automatically update when the child, action tasks are updated.


When adding new tasks, the task will default to an Action task.
Summary tasks are created when another task is indented as a child item under the task.
Note: You can also create a summary task by "Inserting" a task under the target summary task.
The Time field for a task defines the total duration allotted for the
task (for action tasks) or total summation of child action tasks duration (for summary tasks).

When modifying a task, you can edit the time field directly (Finish date will update automatically).
Time/Duration can be defined in Day or Hour time units.

The Start field represents the day that a specific task
is scheduled to begin (for action tasks) or the earliest start date for all
child action tasks (for summary tasks).


The Finish field represents the day that a specific task is scheduled to be completed (for action tasks) or the last task completion date for all child action tasks (for summary tasks).

The Finish date can be set manually or automatically by selecting a Start date and specifying the Time/Duration of the task.
The % Complete field represents the progress of a task (for action tasks)
or the percentage of child action tasks (completed tasks divided by the number of total tasks, for summary tasks).

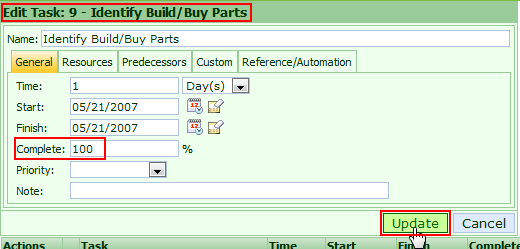
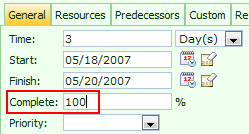
A task is considered complete when the % Complete field is set to 100.

Task resources represent the users responsible for accomplishing/completing any task.
You can assign any number of resources to a task.

Predecessor tasks are tasks in which other tasks rely on to determine their Start date.
Tasks that are assigned predecessor tasks will base their start date on the end date of the processor task.


Assigning predecessor tasks will result in a "waterfall" effect.
Changing the Time, Start, and/or End date will automatically update the dependent task's timeframe.

|
 |
Adding Tasks |
Top |
|
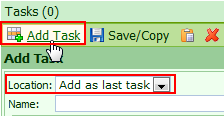
To add a task, click the Add button on the Tasks page.
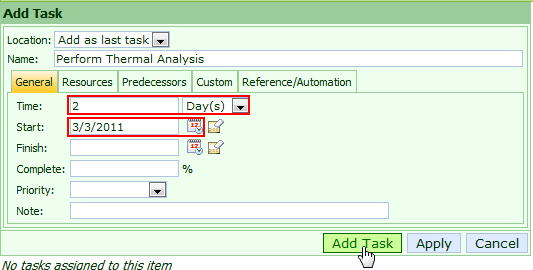
This will display the Add Tasks dialog box.
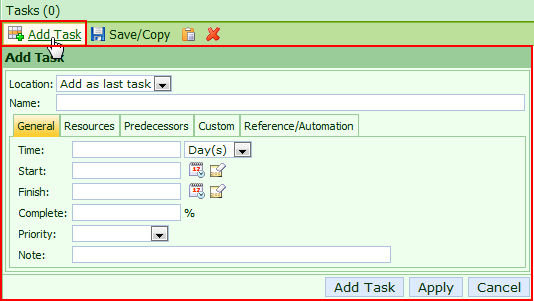
When adding a task from the toolbar, the Location option will only contain: Add as last task

A task name is required for any task. You can define the Task name in the Name field.

The Task Properties dialog box contains 5 tabs:

- General – Set Start date, duration, % Complete, priority, and notes
- Resources – Assign user to task
- Predecessors – Assign predecessor tasks
- Custom – Custom task fields (defined in the Omnify Administrator)
- Reference/Automation – Assign Reference and Automated Task options (described below)
The General tab allows you to set the Start date, duration, % Complete, priority, and notes.
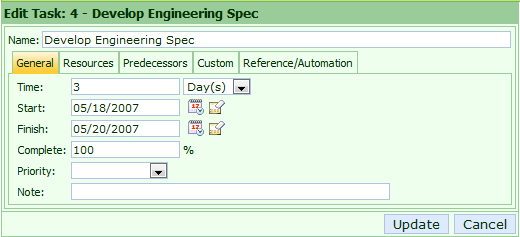
For the system to consider any task to be complete, the % Complete field must be set to 100.
The task priority can be set to indicate the importance of the task.
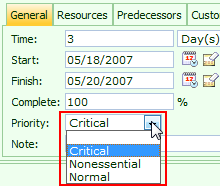
The priority options are defined in the Administrator.
Each option will have a setting that will allow you to define the priority as "Essential" or "Non-Essential".
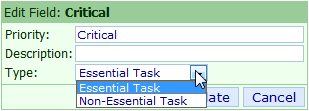
Marking task as "Essential" allows you to control the way the system will allow certain actions.
For example: if you want to prevent the system from allowing a Change/ECO to be released with open tasks, you would set the Priority to an option with an "Essential" setting.
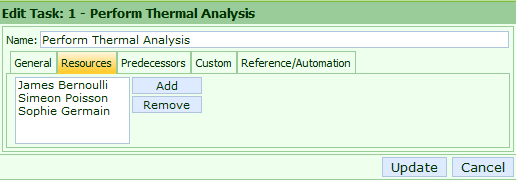
The Resources tab allows you to assign Omnify User(s) to the task.

To add a resource, click the Add button and select the desired user(s).

To remove a resource, first select the user and then click the Remove button.
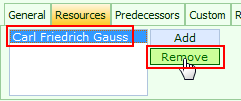
The Predecessors tab allows you specify other tasks that this task depends on.

To specify Predecessor tasks, check the task index checkbox.

Tasks that are assigned predecessor tasks will base their start date on the last end date of the processor tasks.
The Custom tab allows you specify field values for user-defined task fields (Omnify Administrator).

The Reference/Automation tab allows you define reference objects as well as automated tasks.

A full description of Reference and Automated tasks is provided in subsequent sections.
|
 |
Inserting Tasks |
Top |
|
Once tasks have been added, you can change the order and define hierarchy using the task position action options.

You can also insert tasks (before, after, or as a child/action task) using the Add icon in the Actions column.

This will display the Add Task dialog box (see previous section).
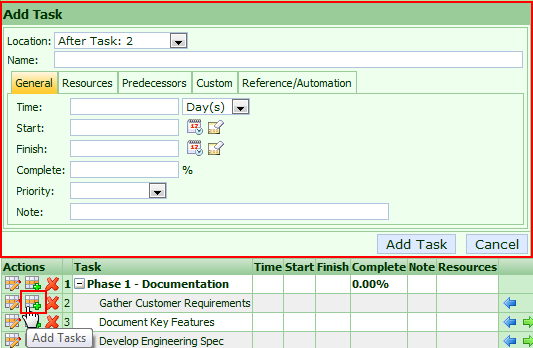
The Location drop list will contain the following options:

| Add as last task |
Appends task as the last task on the list |
| After Task: (selected task index) |
Inserts the new task as an action task after the selected task |
| Before Task: (selected task index) |
Inserts the new task as an action task before the selected task |
| As Child of Task: (selected task index) |
Inserts the new task as a child/action task and assigns the selected task as a summary task |
|
 |
Task Position |
Top |
|
You can move the position of tasks and define the task hierarchy using the task position action options.

 |
Outdent Task (decreases indent level and adjusts for summary/action task structure) |
 |
Indent Task (increases indent level and assigns task as a child item of the previous task) |
 |
Move Task Up |
 |
Move Task Down |
|
 |
Updating Tasks |
Top |
|
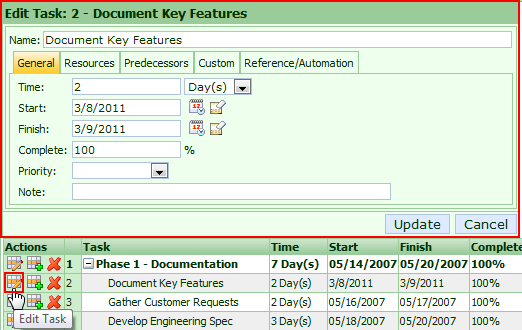
You can edit tasks by clicking the Edit icon in the Actions column.
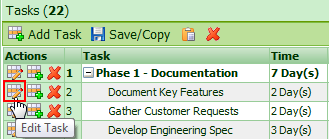
This will invoke the Task Properties dialog box.
All task fields can be modified from this dialog box.
|
 |
Reference Items |
Top |
|
Tasks can contain Reference Items that allow you to describe associations as well as provide an easy method to find/navigate to objects associated with tasks.
Reference Items can point to:
- Items/Parts/BOMs
- Changes/ECOs
- CARs/PARs
- Projects
- Training Objects
To assign a reference item, select the Reference/Automation Tab on the Task Properties dialog box.

Next, select the appropriate Object Type.

Then click the Browse button.

Clicking the Browse button will invoke the Object Search form.
From the Search form you can search on main field keywords (part number, description, rev, status, etc.).

To assign a reference item, click the hyperlink.

The main number will be assigned to the reference section.

Once assigned, reference items will appear as hyperlinks in the tasks list.
Clicking the hyperlink will invoke the reference object.

|
 |
Automated Tasks |
Top |
|
Automated Tasks are tasks that can have their status (% Complete) updated automatically based on Omnify or external system actions.
For example, the release of a Change/ECO can automatically update a task on a Project to 100% complete.
Automated tasks can be updated by the following actions:
- External Action – 3rd party tool/system/utility will update the status of the task
- Item Release – The signoff and release of an Item (Part, BOM, Document, etc.) will update the status of the task
- Change/ECO Release – The signoff and release of a Change/ECO will update the status of the task
- CAR/PAR Release – The signoff and release of a Quality (CAPA) Object will update the status of the task
- Training/Test Complete – The completion of training will update the status of the task
- Project Status Change – The change in status (% Complete) of a project will update the status of the task
Omnify Web Services provide the ability to easily update task status from 3rd party tools.
To create an automated task, click the Reference/Automation tab from the Task Properties dialog box.

If the task is to be automated based on an Omnify object, first set the Object Type.

Then click the Browse button.

Clicking the Browse button will invoke the Object Search form.
From the Search form you can search on main field keywords (part number, description, rev, status, etc.).

To assign a reference item, click the hyperlink.

The main number will be assigned to the reference section.

Next, check the This task is an automated task option.
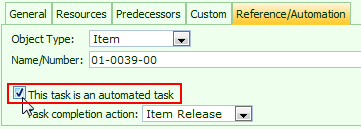
Once the Object Type has been selected, the dialog box will update the
"Task completion action" drop list with the available actions for that object.
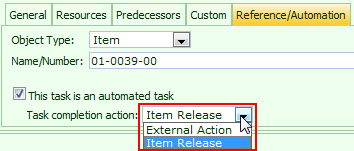
Note: The "External Action" option is available for all objects, and does not require a reference item.
|
 |
Task Templates |
Top |
|
Task templates provide you with the ability to define common tasks for objects (such as Projects, Quality/CAPA processes, and Change/ECO tasks).
Task templates can be applied/appended to objects using "Paste" operations.
Task templates are created using Omnify Desktop and managed/modified in the Omnify Administrator.
Task templates are created on the Tasks tab/page of the Project, Change/ECO, Quality/CAPA, or Training forms in Omnify Desktop.

From the Tasks page you can create a list of tasks (refer to the Desktop User's Guide for more information on editing tasks)
and then click the Save/Copy toolbar button.

From the Actions drop list, select the Save as Template option.

You can then specify a name for the template and click the Save/Copy button to create the template.

Note: Task templates will be "object specific" (i.e. Project-based task template will only be available to other Projects).
However, you can copy/create "generic" templates in the Omnify Administrator that will be available to all objects.
Once a task template has been created, you can assign/append it to any existing object's task page by clicking the Paste toolbar button.
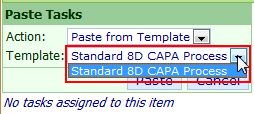
This will present the Paste Tasks dialog box.
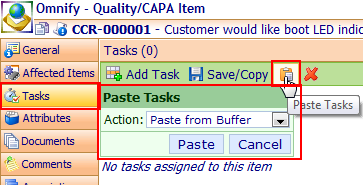
From the Action drop list, select the Paste from Template option.
This will present a list of available task templates.

Note: Task templates will be "object specific" (i.e. Project-based task template will only be available to other Projects).
However, you can copy/create "generic" templates in the Omnify Administrator that will be available to all objects.
To assign the template, select the desired task template from the Template drop list and then click the Paste button.

The template tasks will be appended to the existing task list.
|